Blender Essentials for Beginners: Stop Getting Lost in the Viewport is a practical beginner class designed to help new Blender users build confident, repeatable navigation habits inside the viewport.
Many beginners do not struggle because they lack ideas. They struggle because the viewport feels unpredictable. This course solves that problem by teaching the essential camera and navigation controls step by step inside a real Blender practice scene.
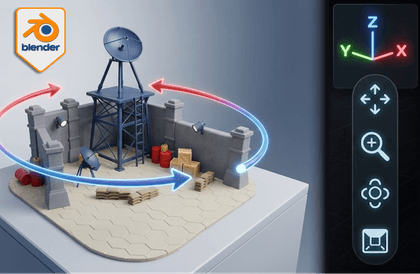
Across 11 focused lessons, students will learn how to use the viewport gizmo, axes, and projection views, then move into the core navigation skills that make Blender feel far more controllable: orbiting, panning, zooming, framing, and quick reset shortcuts. The course also covers Fly mode, Walk mode with gravity, Numpad views, isometric angles, Quad View, and key Blender preference settings that improve orbit, rotation, perspective, and zoom behaviour.
Rather than simply memorising shortcuts, students will practise these skills in a stylized miniature military signal base scene so they can develop reliable habits for inspecting objects, checking composition, and recovering their view quickly when they lose orientation.
By the end of the course, students will feel much more comfortable navigating inside Blender, which makes future work in modelling, layout, lighting, and scene building far less frustrating.


![[Fantasy Pig's Feet] From design to codingCourse Thumbnail](https://cdn.inflearn.com/public/courses/332845/cover/5d0ef569-50e5-4300-96ed-3205d526795b/332845.png?w=420)

![[Photoshop Revolution Broadcast] Photoshop Advanced Completion - Mastering the Pen ToolCourse Thumbnail](https://cdn.inflearn.com/wp-content/uploads/photoshop001.jpg?w=420)