High-Speed Embedded Board Design Project (feat. Smartphone)

A hands-on course on AP-based high-speed motherboard design as required in the field by Samsung, LG, Hyundai Motor, Hanwha Systems, and the robotics/industrial equipment industries. Using the RK3399 SOM as the reference, the course integrates PMIC power sequencing, LPDDR4 constraints (length/impedance/return path), and USB3/HDMI/MIPI/PCIe design into a single workflow, producing complete deliverables including design rationale documentation, schematic creation, layout design, and the bring-up inspection sequence.

(5.0) 5 reviews

133 learners

Level Intermediate

Course period Unlimited

Embedded
Embedded
hardware
hardware
artwork
artwork
kicad
kicad
orcad
orcad
Embedded
Embedded
hardware
hardware
artwork
artwork
kicad
kicad
orcad
orcad

Reviews from Early Learners

5.0

5.0

sunny75

100% enrolled

===== 26/02/19/Thu 14:00 ===== Wow~~~! You are amazing. I can feel that the level of all the lectures—Analog / Digital / Circuit Design / PCB—is incredible. I’ve realized that Coach Sam can do everything on his own. Thank you for creating such great lectures.

5.0

정현석

11% enrolled

It's the best.

5.0

두리안 수호자

35% enrolled

This is a great help.

What you will gain after the course

  • Portfolio showcasing mainboard design experience at the AP level, beyond the “MCU board” level

  • Establishing a high-speed interface (PCIe, DDR, USB/HDMI/MIPI, etc.) design checklist and organizing failure causes and prevention points

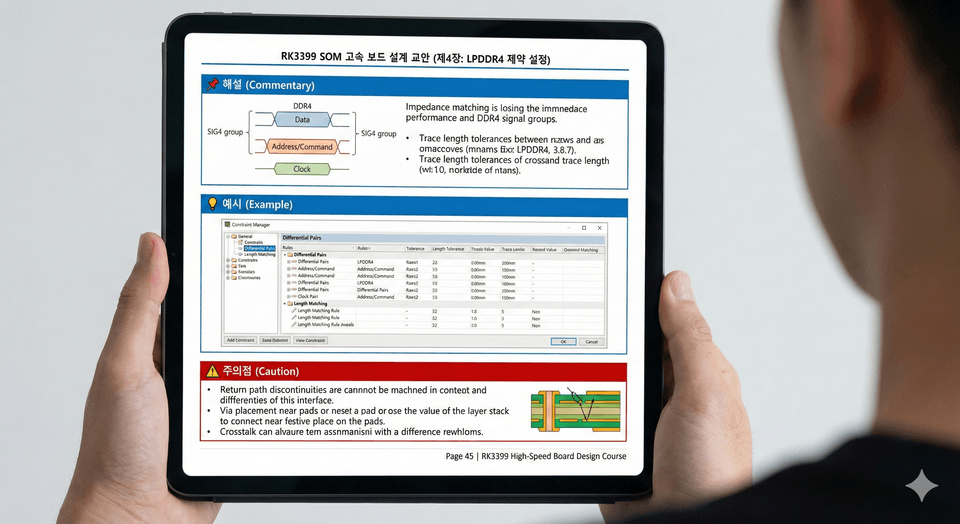
  • Summarize DDR/high-speed signal design constraints (length, impedance, and group criteria) and complete the Constraint Table

  • Documentation of the power design rationale (PMIC/sequencing/PDN)—including rail definitions, loads, and decoupling—and creation of a design criteria table

  • Define stack-up/layout priorities (DDR → high-speed I/O → other) and document the routing strategy

  • Organize the bring-up check sequence (power → clock → boot → DDR → I/O) and write the hardware verification flow.

"smartphone SoC"-level
Those looking for circuit design
please payattention 👇

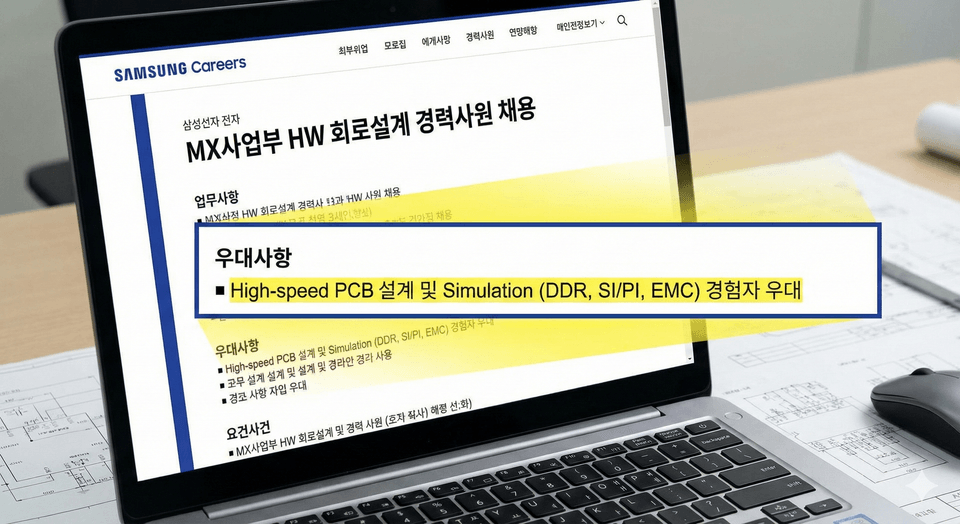
🔎Looking at job postings from major companies...

Samsung Electronics MX, DA, and VD Divisions, LG Electronics, Hyundai Motor Company/Hyundai Mobis, Hanwha Systems, and more

What are the "circuit design and HW design skills" required across all industries?

Samsung Electronics DX Division MX Business Department Circuit Design Experienced Hire Job Description

It is the ability to perform "high-speed design."


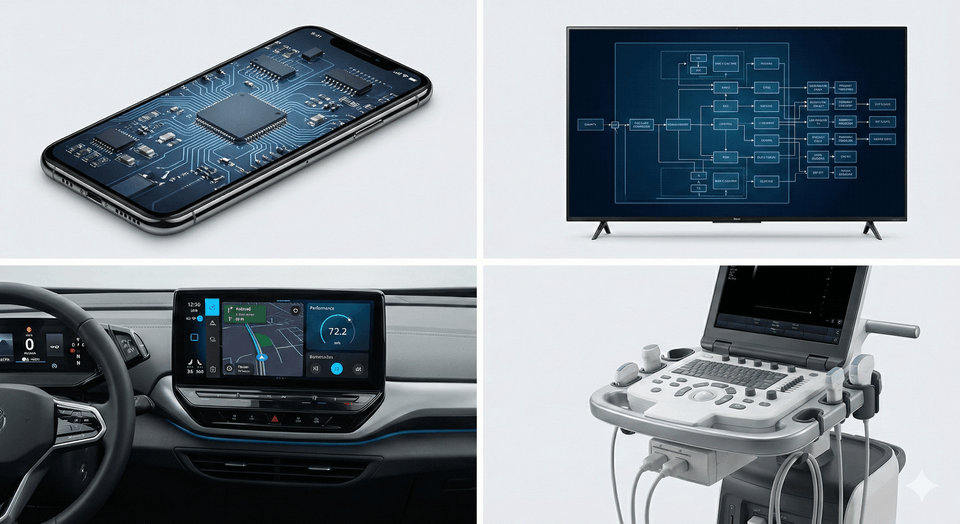
When you think about it,
all the electronic devices we use
such as PCIe, DDR, USB4/Thunderblot, Ethernet, and HDMI
often operate at 100Mbps or higher,
and in many cases even exceed 1Gbsp.

Various electronic products equipped with High-speed Systems


However, although we have experience designing
"STM32 embedded boards"(link),
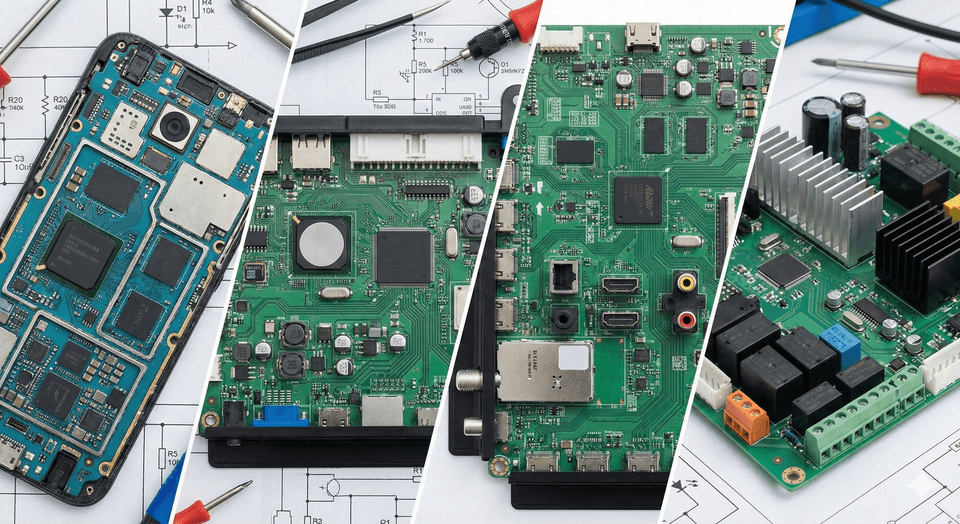
AP-class "SoC (System on Chip)"-based
"High-speed Board" design experience is something we lack..

Various types of SoC- and SOM-based high-speed boards


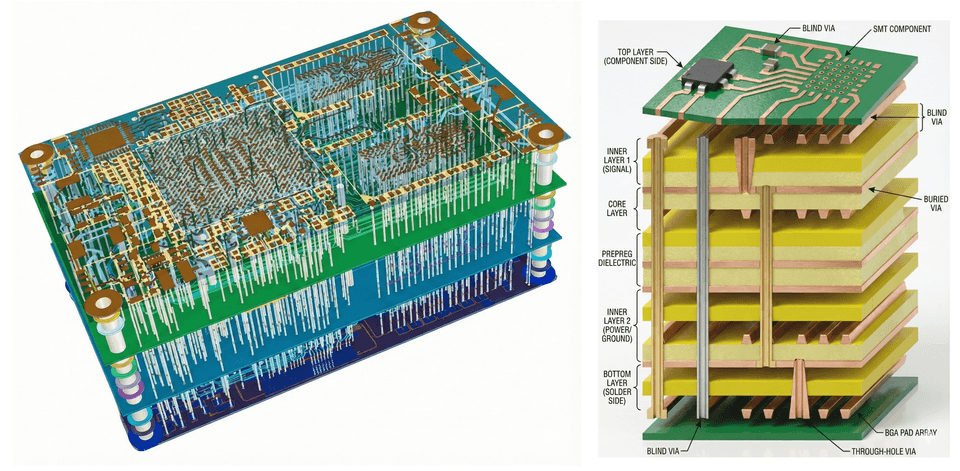
These “SoC boards” have as many as
PCB layers10–14 layers, so
trying to self-study on your own is practically “impossible.”

PCB Stack with 10–14 Layers

🔥We’ll wrap up SoC-based high-speed circuit design in one go.

AP (SoC)-class
motherboard
schematic design

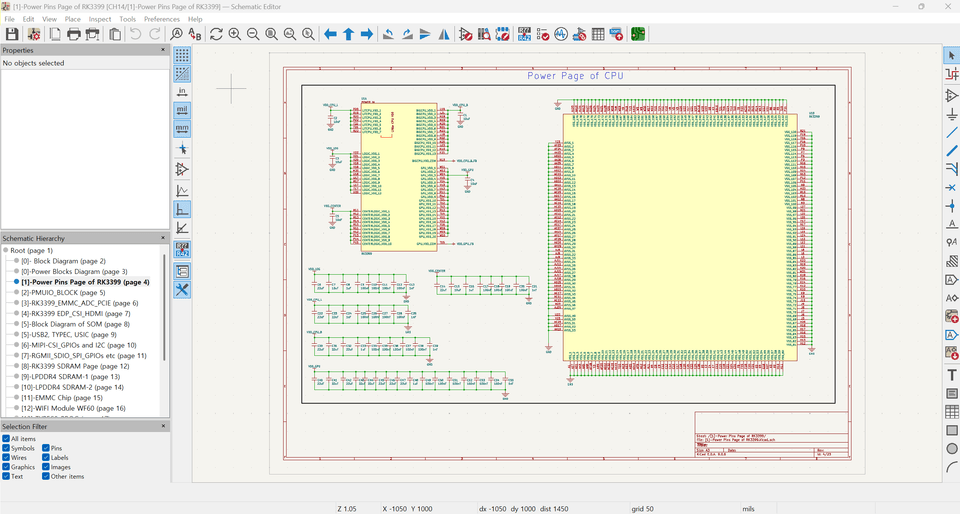
This course covers the practical Schematic design of an AP (SoC) board based on the RK3399 SOM.
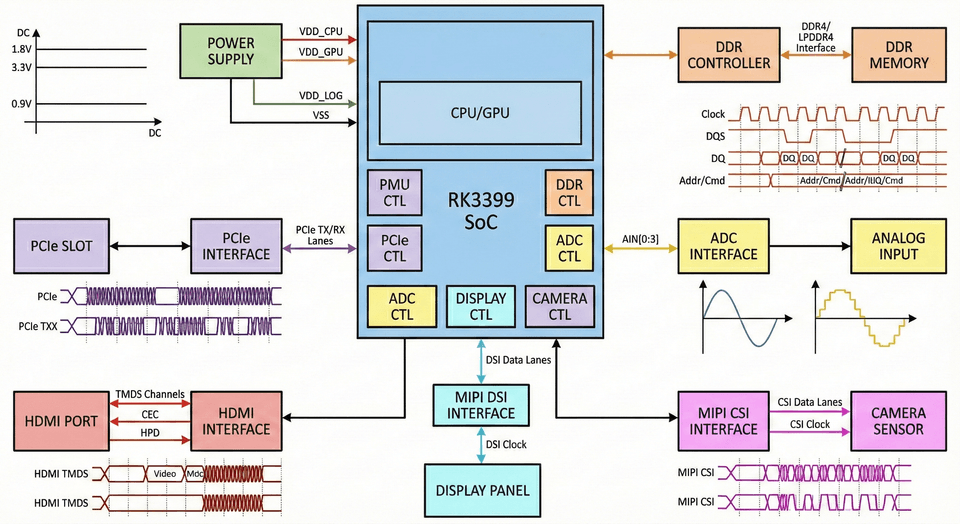
Power Tree/power sequencing, LPDDR4, eMMC, and WiFi circuit configuration, and key design considerations for USB3/HDMI/MIPI/PCIe interfaces are the main focus, allowing you to learn the actual design workflow and documentation methods.

AP (SoC)-class motherboard schematic design

High-speed
PCB Layout Creation and
Gebber Output

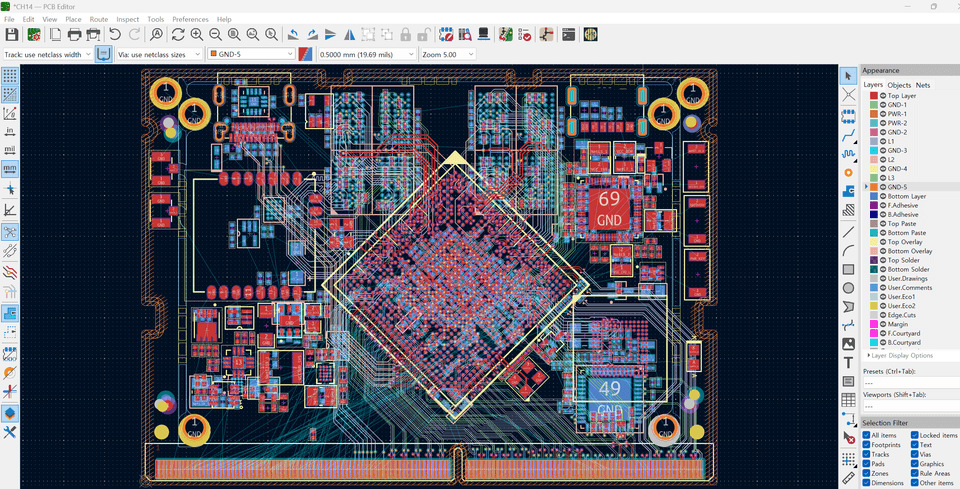
From defining the stackup and impedance through placement and routing, you will practice the entire PCB layout process, including routing and length matching for high-speed interfaces (DDR/USB3/PCIe/HDMI/MIPI, etc.). Finally, you will complete DRC/DFM reviews and generate manufacturing deliverables such as Gerber and drill files, allowing you to finish with results ready for actual production.

High-speed PCB layout production and Gerber output

12-Layer Stackup
High-Speed
Board Design

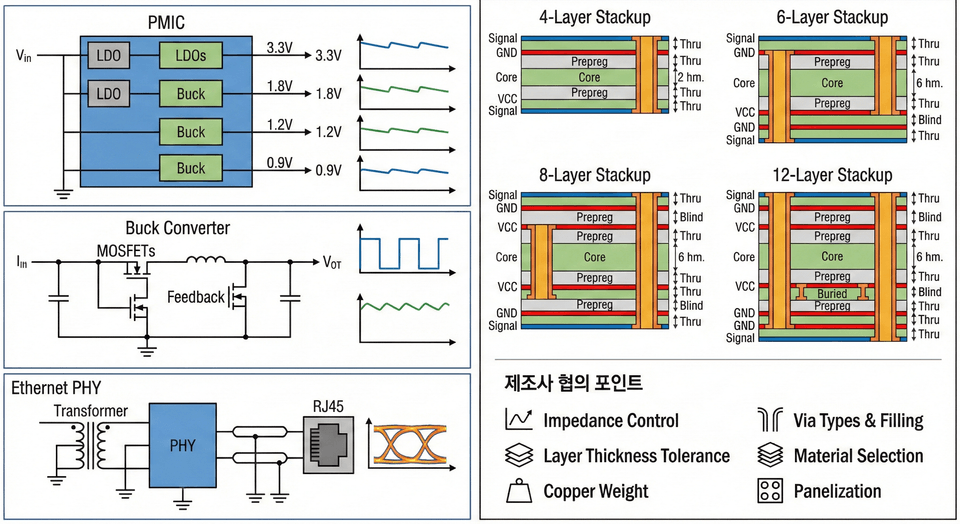
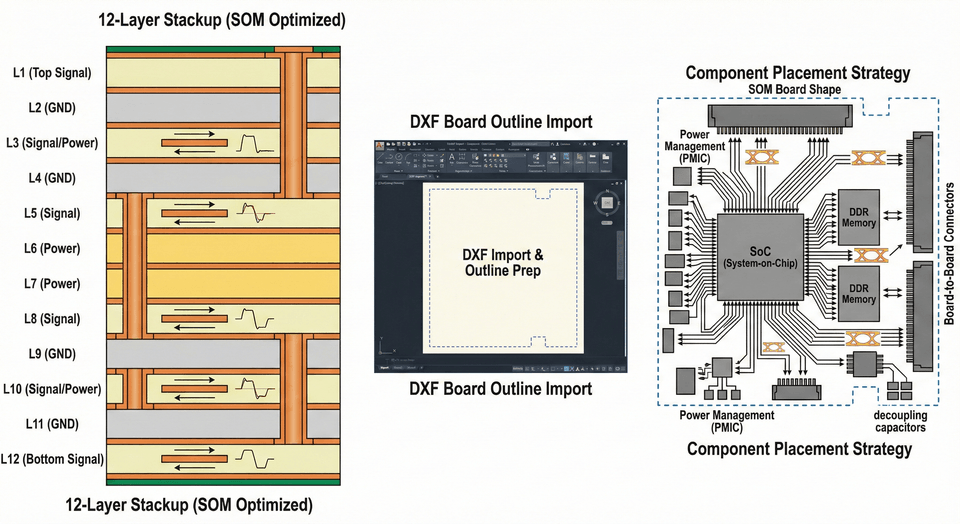
Design a 12-layer stackup configuration tailored to an RK3399 AP-class board, and optimize the layers based on reference plane/return path criteria for high-speed signals. In addition, consult with the PCB manufacturer using a checklist covering impedance tolerances, materials (prepreg/copper foil), via structures, and process limitations to finalize a manufacturable stackup.

12-Layer Stackup High-Speed Board Design

3D View-based
layout verification and
portfolio output

Using KiCad’s 3D View, you will visually verify the board shape, connector interference, component heights, and more to improve the overall layout quality. The practice results will be organized into 3D-rendered images and verification evidence (checklist), which can be used as a portfolio that demonstrates your design skills in your resume, cover letter, and interviews.

3D View-Based Layout Verification and Portfolio Deliverables

Self-Study Notes Included

The 20-hour course includes content that could not be covered due to time constraints. That’s why we compiled practical know-how from industry engineers, debugging case studies, and key points to supplement the power sequencing/Power Tree areas where learners often get stuck during practice into a separate self-study guide, along with LPDDR4 constraint and length-matching troubleshooting, real-world high-speed routing mistakes, and items to check when generating DFM/Gerber outputs. When reviewing or when you run into difficulties while working on assignments, you can open it up and refer to it right away.

A self-study note included


📚

Project-based learning focused on real-world practice
Strengthen your design skills!

Overview of Embedded Board Design and Career Roadmap

Section 1

Overview of Embedded Board Design and Career Roadmap

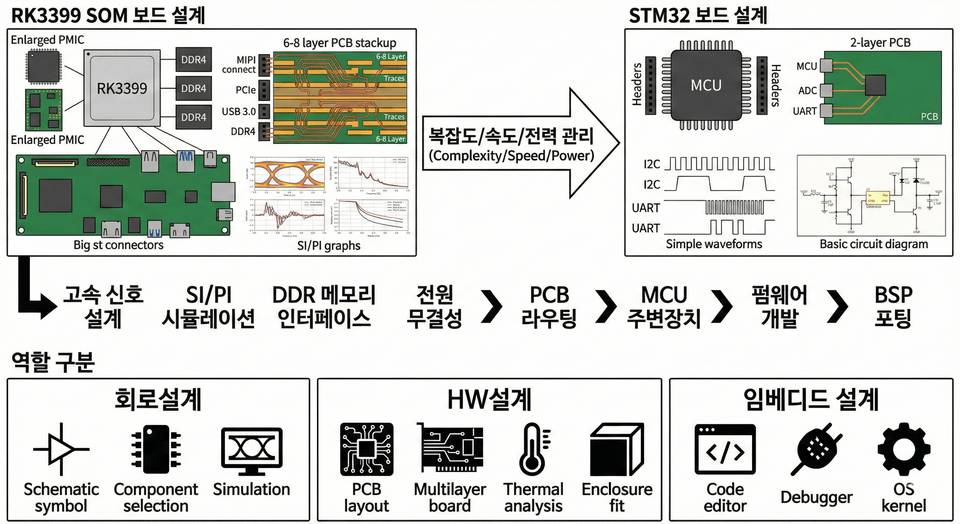
In this section, you will gain an understanding of the overall embedded board design process, focusing on RK3399 SOM board design. You will compare it with STM32 board design, connect the learning content through relevant job description keywords, and clarify the distinctions between the roles of circuit design, HW design, and embedded design.


Setting Up the PCB HW Design Tool Environment (Schematic)

Section 2

Setting Up the PCB HW Design Tool Environment (Schematic)

Set up the KiCad or Orcad environment, essential tools for PCB design, and learn how to create component libraries and symbols for embedded board design. In addition, this section covers power tree design, including LDO/DCDC decoupling strategies, and configuration of JTAG/SWD debugging interfaces.


Setting Up the PCB HW Design Tool Environment (Layout)

Section 3

Setting Up the PCB HW Design Tool Environment (Layout)

In this section, you will optimize signal, power, and ground planes through 4-Layer PCB stackup design. You will learn how to migrate schematic data to the PCB and component placement strategies, and practice laying out Ethernet PHY- and MCU-based blocks.


Decide what to build and choose a processor

Section 4

Decide what to build and choose a processor

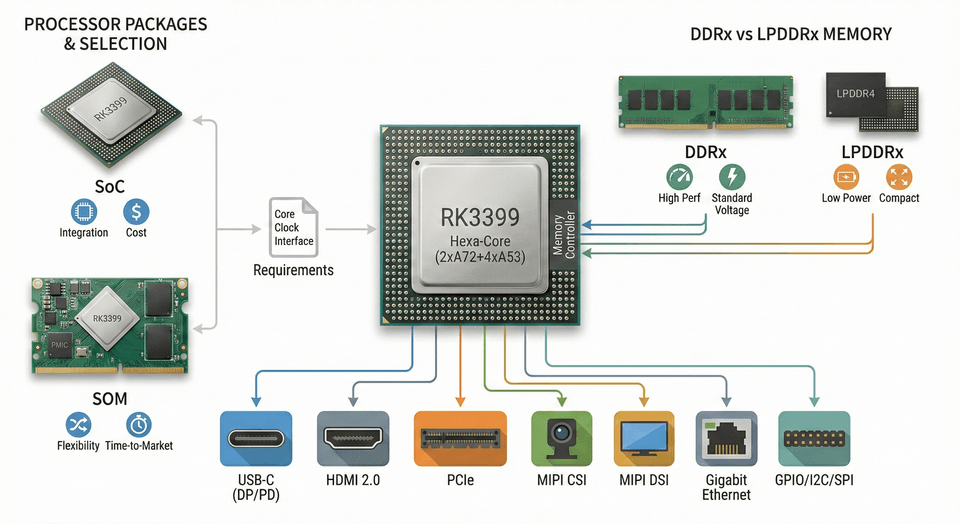
Learn about various processor package types (SoC, SOM) and selection criteria, derive the core, clock, and interface specifications based on the requirements sheet, analyze the key contents of the RK3399 datasheet, and distinguish between the concepts and implementation methods of DDRx and LPDDRx interfaces.


Narrowing Down Candidates by Grouping Memory Signals

Section 5

Narrowing Down Candidates by Grouping Memory Signals

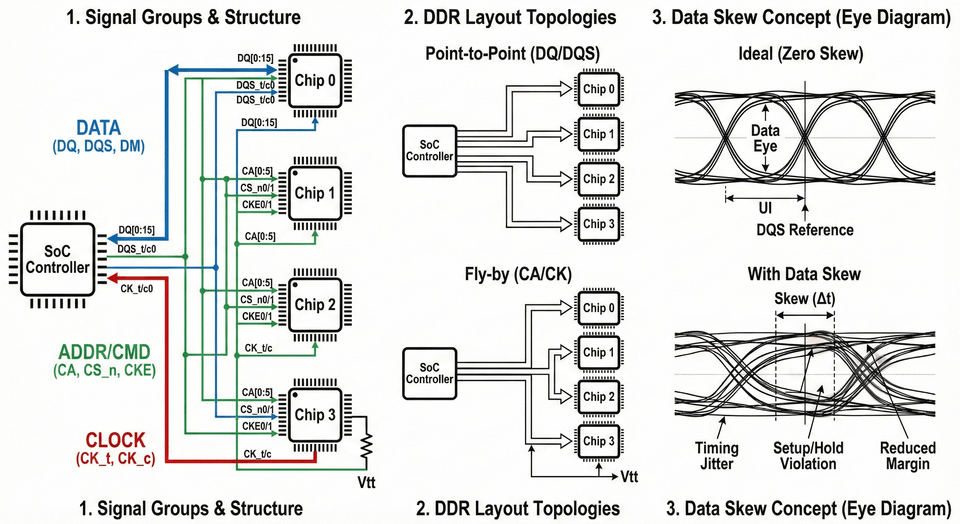
Compare the selection criteria for DDR3/DDR4 and LPDDR3/LPDDR4, and conduct an in-depth analysis of LPDDR4’s data, address/command, control, and clock group structures. Understand DDR layout topology and the concept of data skew, and learn about DDR-related content through the RK3399 datasheet.


Purchase memory chips and draw schematics

Section 6

Buying memory chips and drawing the schematic

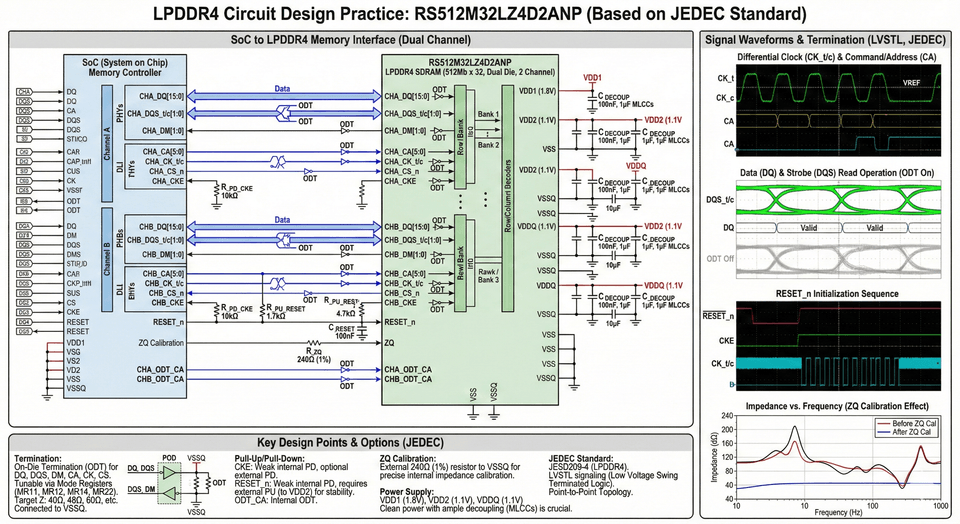
We visit component websites directly to compare specifications, unit prices, inventory, and lead times before deciding which chips to use. After explaining why the selected chip’s datasheet and the relevant standards documents should be read together, we draw the schematic in two stages, covering everything from the basic connections to optional pins, termination, and pull-up handling.


Attaching Storage Devices and Wireless Modules

Section 7

Attaching Storage and Wireless Modules

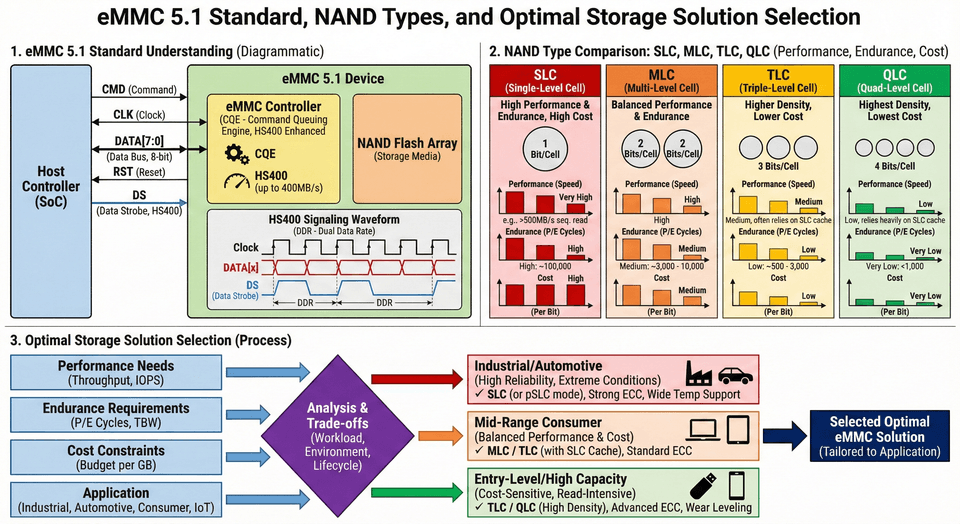
We start by adding the storage device. We examine how performance, lifespan, and cost vary depending on the NAND cell type, choose one, and then draw the schematic. Next, for the wireless module, we first determine the essential functions, narrow down the candidates, and extract the pin configuration and power requirements from the datasheet before attaching it to the board.


Finalizing the wireless section, power rails, and block diagram

Section 8

Finalize the wireless section, power rails, and block diagram

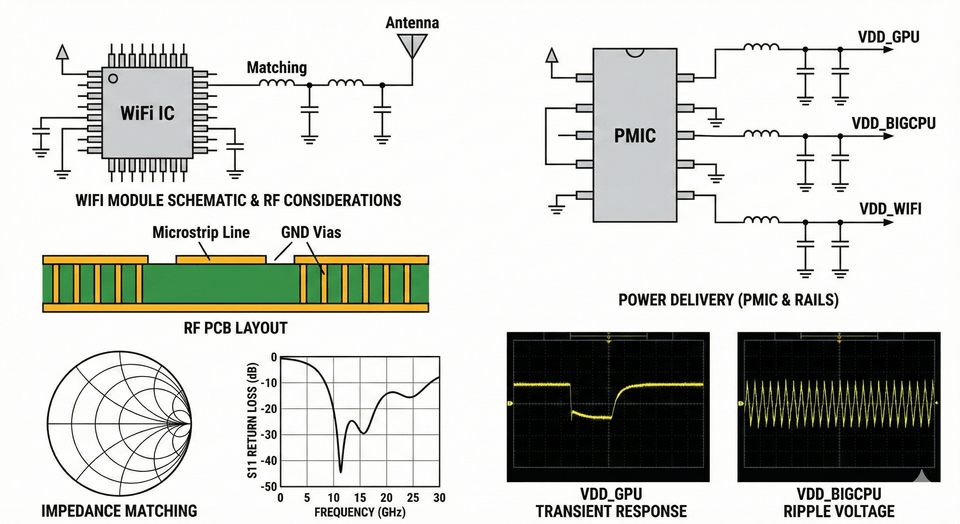
Learn the schematic design of the Wi-Fi module and considerations for RF peripherals, and cover the design of major power rails such as VDD_GPU and VDD_BIGCPU. Learn the key points of schematic design for the RK3399 LPDDR4 DDR controller, and practice integrating the schematic designs for the Wi-Fi module, power pins, and SDRAM.


Creating a library for a 828-pin chip split into sections

Section 9

Creating a library for dividing the 828 pins

Since an 828-pin chip cannot all be drawn on a single sheet, we divide it by function. We split the symbol into the power section, memory controller, high-speed expansion and display, and low-speed interfaces to create the library, then compare its structure with the manufacturer’s design guide.


A Quick Overview of Interfaces to Put on the Board

Section 10

A quick overview of interfaces to put on the board

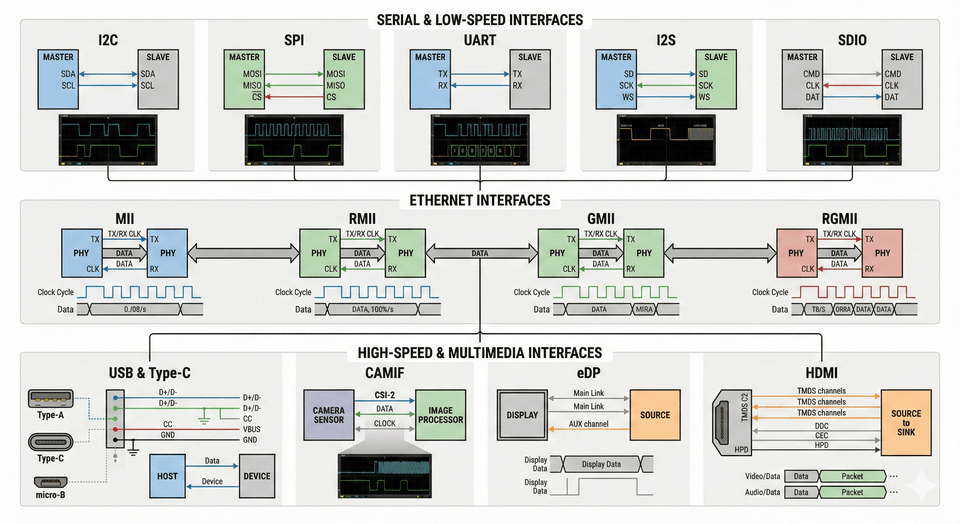
This section organizes at once the interfaces that were only briefly mentioned earlier. We’ll look at the differences between synchronous and asynchronous interfaces, what is used for audio and wireless, how wired LAN is connected, and finally review the interfaces for USB, displays, and cameras.


Schematic Completion and Determining the Number of Board Layers

Section 11

Completing the Schematic and Determining the Number of Board Layers

Gather all the voltages required by the chip and decide how to generate them. Draw the power IC and communication PHY circuits to complete the schematic, then finalize how many layers the board will have and what needs to be coordinated with the manufacturer.


Set the Board Framework and Perform the Initial Placement

Section 12

Defining the Board Outline and Initial Placement

Configure a 12-layer stackup optimized for the SOM board, and prepare for importing the DXF board outline and placing components. Establish a SOM board placement strategy centered on the SoC, memory, and connectors, and review the checklist to verify after the initial placement.


Refining the Layout for Manufacturability

Section 13

Refining the layout for manufacturability

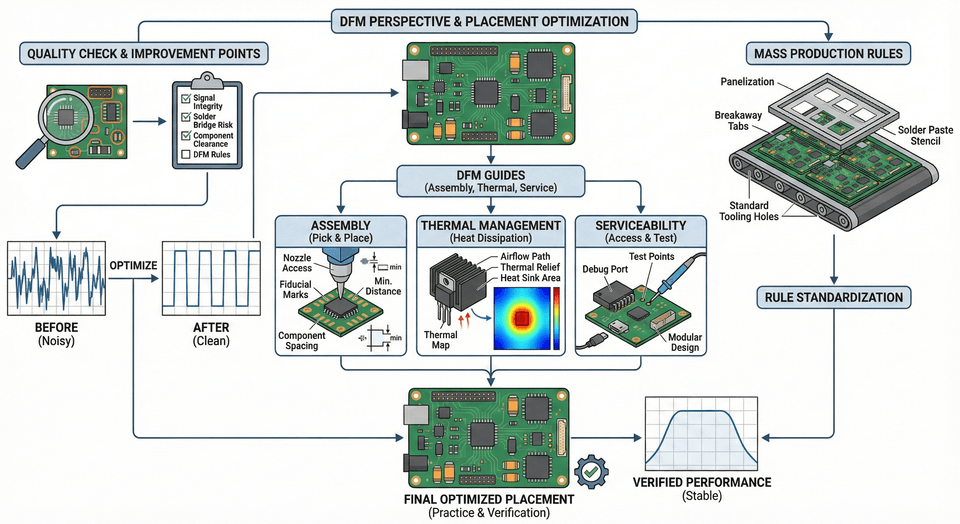
Review the quality of the component placement and organize areas for improvement, while learning placement guidelines that consider assembly, heat dissipation, and ease of servicing. Establish placement rules with mass production in mind and improve placement quality through hands-on practice.


Setting rules for routing out of the BGA

Section 14

Setting Rules for Routing Out of the BGA

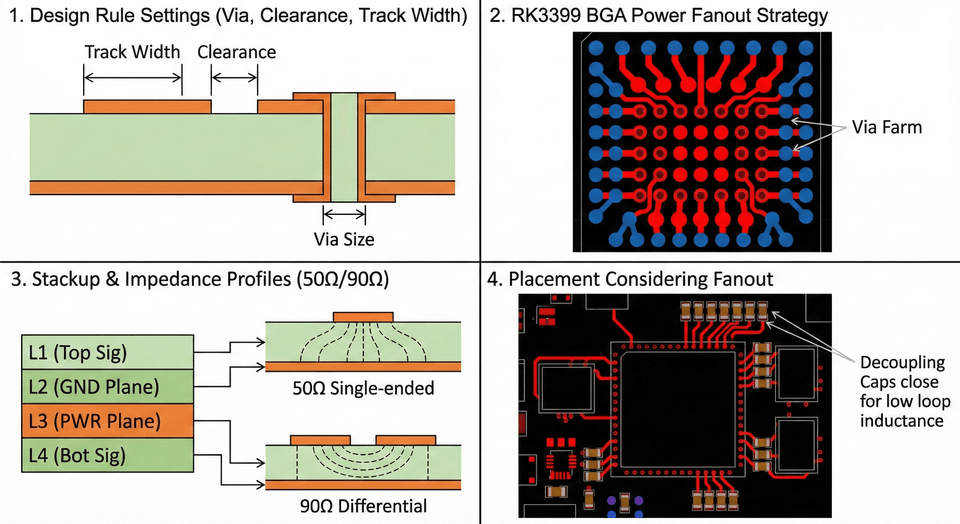
Before starting the routing, establish the rules first. Set the via dimensions, spacing, and trace widths, and create a pattern for routing power out of the 828-pin BGA. Define the impedance profile and align it with the previously determined layer stackup, then refine the placement accordingly.


Routing memory traces by byte group

Section 15

Dividing Memory Wiring into Byte Groups

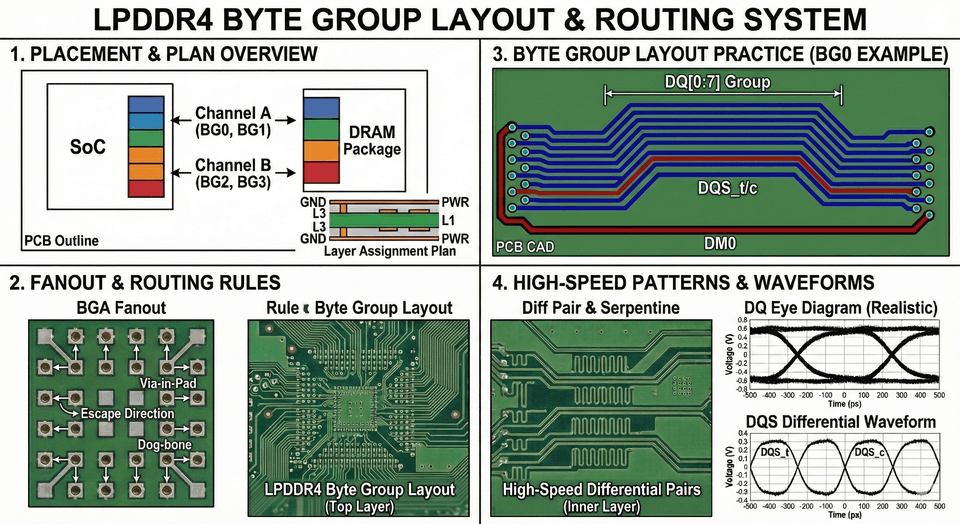
Establish the placement and layout plan for LPDDR4 byte groups, and detail the fanout and routing rules for byte groups. Practice LPDDR4 byte group layout, and learn the routing patterns for the remaining byte groups and high-speed signals.


Match lengths and finish the board

Section 16

Match the Lengths and Finish the Board

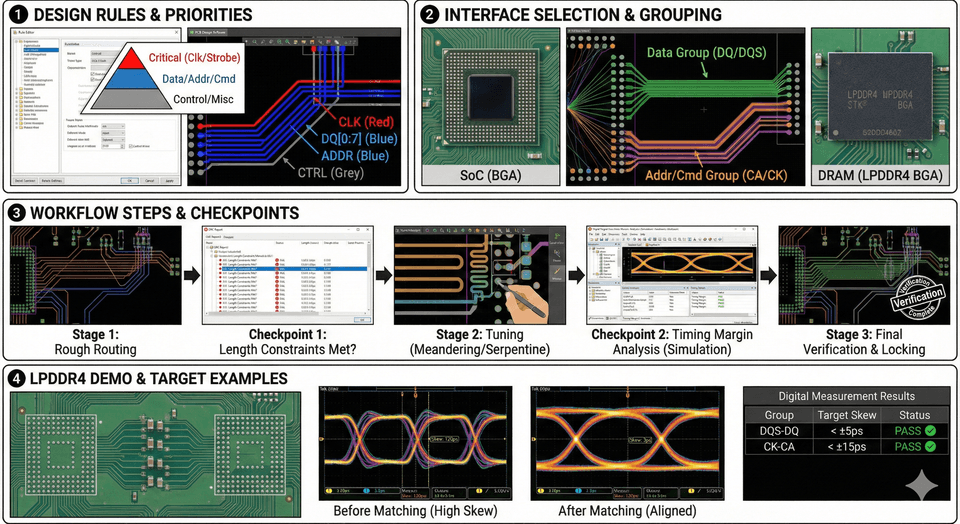
Organize the design rules and priorities for high-speed signals, and learn how to select and group interfaces for length matching. Understand the sequence and checkpoints for each stage of length matching, and practice through an LPDDR4 length-matching demo and examples of target values.


We can address the concerns of people like these!


📌

Those with limited circuit design experience
Entry-level/junior engineers

  • Those with MCU board design experience but concerned about their competitiveness in the job market due to a lack of an AP-level high-speed board design portfolio

  • Those who want to systematically build the AP-based high-speed design experience required in the field.

📌

Those exploring a gradual career change
Electrical engineering majors

  • Those who feel uncertain about their career due to the decrease in semiconductor IC design openings but want to create a new Career Plan B in board-level design

  • Those who want to strengthen their competitiveness by developing specific AP-level mainboard design skills

📌

Those who struggle to explain the rationale behind their designs
Working professionals

  • Those who only talk about their circuit/layout experience in interviews and consistently struggle because they are weak at providing specific design reasons or rationale.

  • Those who want to learn how to document design rationale and package a portfolio based on practical experience, and leverage it when changing jobs or negotiating

Pre-Course Notes


Practice environment

  • Operating system: Windows 10/11 (64-bit)

  • Required software: KiCad (free)


    Download → https://www.kicad.org/download/windows
    (Compatible with OrCAD / Altium)

  • Recommended specifications: 8GB RAM or more, at least 10GB of SSD storage, and an Intel i5-class CPU or better

Prerequisite Knowledge and Notes

  • Experience designing MCU boards and basic circuit design knowledge required
    Prerequisite course → https://inf.run/z6KM1

  • A basic understanding of schematic circuit diagrams and PCB layout principles is essential.

  • Because AP-level board design is more difficult than MCU board design,
    an attitude of learning and actively looking things up yourself is important!!

Learning Materials

  • Lecture slide PDF provided

  • Datasheets and related documents for the RK3399 SOM and devices used in the hands-on training provided

  • Assignments and feedback provided upon submission
    Feedback is provided through the Naver Cafe → https://cafe.naver.com/samcoach

  • Design rationale documents, schematic, and layout example files provided


✨✨✨✨✨✨✨✨✨✨✨✨✨✨

1st Early Bird Discount EVENT!

1st Early Bird EVENT: 600,000 won X → 390,000 won

2nd Early Bird EVENT: 600,000 won X → 420,000 won

3rd Early Bird EVENT: 600,000 won X → 450,000 won

...
✨✨✨✨✨✨✨✨✨✨✨✨✨✨

This course communicates with students through a Naver Cafe!

  1. Please join the open KakaoTalk chatroom to receive announcements! (Participation code: 0459)
    ➡https://open.kakao.com/o/gm1KFaCg

  2. Please join the Naver Cafe to receive the course materials!


    ➡https://cafe.naver.com/samcoach

  3. Through live classes held every month, we provide assignment feedback and consultations on your concerns!


    ➡ The schedule and live class details are announced every month through the Naver Cafe (replays provided!)

  4. We provide a variety of information and events to help you get a job!
    ➡ Upgrade your cafe membership level + continuous updates + access even after completing the course.

Access to Samcoach’s community for aspiring circuit designers and EVENT participation is now ON!

You are invited to Samcoach's Naver Cafe for aspiring circuit designers!

https://cafe.naver.com/samcoach
To upgrade your cafe membership level, please enroll in the course and join the cafe, then fill out the form below!
https://forms.gle/r76HSgCHNyf43qmV6

For students,

  • Sam Coach Group Consulting Pass

  • Advanced Student Resource Access

  • Discounts on other content

Various benefits are available, including the ones listed above.

Sam Coach Naver Café

Regular updates planned!

We plan to continually update the content that needs supplementation through ongoing communication with students.


Nice to meet you, I’m Sam Coach, your circuit design mentor! 🙌

  • Former fifth-year CHIP circuit design engineer in Samsung Electronics’ DS Division

    • Analog IP / Digital Scenario Design

    • A-grade patent application

  • Technical support for engineers at global foreign companies

  • Former) Startup hardware accelerator / MCU firmware design

  • Formerly: Major home appliance company / All-in-one water purifier production technology

  • Former) Mid-sized medical device company / PCB hardware, CIS, and DDI ASIC design


🧭 Mentor Activities 

  • Author of the Circuit Design section of “The Semiconductor Job Bible: Industry Professionals Speak by Job Function”

  • ‘Korea Semiconductor Industry Association SEMI-MOOC’ Circuit Design Core Theory and Simulation Instructor

  • ‘Korea’s No. 1 STEM Employment Platform, Letuin & Career Community Comento’ Circuit Design Career Mentor

  • Conducted circuit design job boot camps and career lectures at more than 10 universities, including Yonsei University, Hanyang University, and Konkuk University.

  • Over 200 resume, personal statement, and interview consulting sessions related to circuit design positions

  • ‘K-Digital Basic Competency Training’ Instructor (Stop struggling with difficult circuit formulas—semiconductor circuit (chip) design by eye)

  • ‘Pathfinder Sam Coach’ YouTube channel for circuit design careers.

See you in class! 🖐🏻

Just by reading this post, you already have what it takes to pursue a career in circuit design. My role is to help passionate people like you turn your challenges into success.
This course will give those of you taking on the challenge of circuit design a “distinctive design experience.”

Of course, you’re welcome to join me and work on circuit design projects according to the roadmap, but first, please try what you can on your own through the free course (click). Then, if needed, enroll in the course.

I look forward to seeing you in the course. Thank you 😊

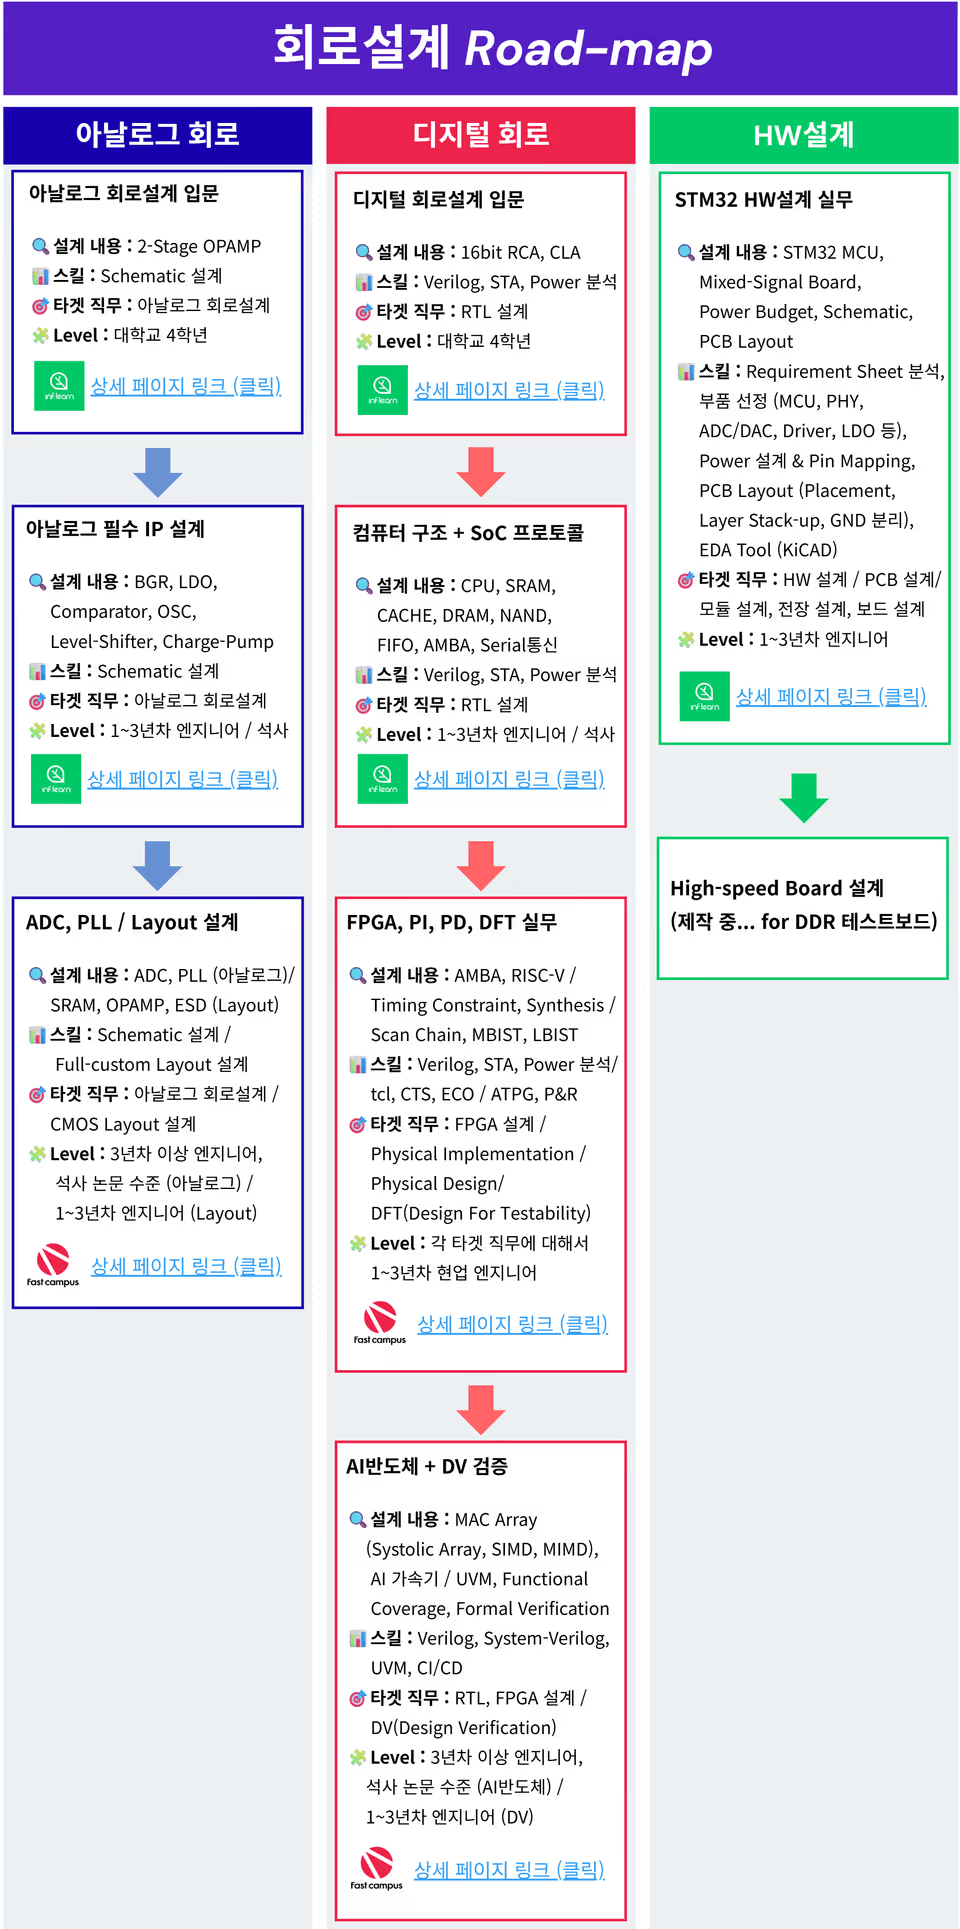
🪜 View the full Sam Coach circuit design course roadmap
(Click the image below)

Credits & References

The schematics and PCB in this course were newly created in KiCad with permission, using the PCB Design Files from Aviral Mishra / EsteemPCB Academy as a reference.

Credit: Aviral Mishra / EsteemPCB Academy

Reference: High-Speed Board Design Course System On Module - EsteemPCB (udemy)

Recommended for
these people

Who is this course right for?

  • A job seeker with undergraduate project and MCU board experience but no AP-level board experience, making it difficult to differentiate their portfolio.

  • An electrical engineering major whose career prospects feel uncertain due to a decline in semiconductor IC design openings and who wants to develop a concrete Plan B in board-level design

  • Those who only say “I worked on circuit schematics/layouts” in interviews and always get stuck because they struggle to explain why they made those design choices.

  • Those who find DDR/high-speed interfaces difficult and have no clear criteria for setting constraints (length, impedance, return path)

  • Current professionals who have experience with power (PMIC/sequencing/PDN) but lack AP, DDR, and high-speed I/O integration experience and need a “main project” to increase their market value.

  • An engineer whose career has stagnated because they only handle MCUs and power-related work at the company, while another team always handles high-speed boards.

  • Those who want to systematize the troubleshooting sequence and observation points, since problems during bring-up are currently diagnosed by guesswork.
  • Those who want to craft a one-liner that resonates in job changes/negotiations and need guidance on documenting design rationale and packaging their portfolio.

Need to know before starting?

  • Basic knowledge of electronic circuits (power supplies/capacitors/regulators, fundamental concepts of digital signals)

  • Reading comprehension sufficient to read datasheets and reference designs and extract key conditions (even if you’re a beginner, the course will provide the necessary guidelines).

  • A PC capable of installing and running KiCad or Altium (how to use the tools themselves will be covered in the “hands-on practice videos”)

  • PC suitable for hands-on practice: Windows recommended (specifications capable of installing EDA tools, managing libraries, and generating output files)

  • (Recommended) A basic understanding of the PCB manufacturing/assembly process (Gerber, BoM, pick-and-place, etc. will be explained from the perspective of the deliverables)

Hello
This is samcoach

Inflearn Verified

Career Verified

5,949

Learners

569

Reviews

310

Answers

5.0

Rating

11

Courses

Key Experience

  • Former 6th-year Samsung Electronics DS Division / CHIP Circuit Design Engineer

  • Analog IP / Digital Scenario Design

  • Class A patent application

  • Technical support for global enterprise engineers

Previous Experience

  • Former Startup Hardware Accelerator

    • MCU Firmware Design

  • Former major home appliance corporation employee

    • All-in-One Water Purifier Production Technology

  • Former mid-sized medical device company employee

    • PCB HW, CIS, DDI ASIC Design


Mentoring Activities

  • Author of the Circuit Design Part in "The Semiconductor Job Bible: Insights from Current Professionals by Role"

  • Korea Semiconductor Industry Association SEMI-MOOC

    • Instructor of Core Circuit Design Theory and Simulation

  • No. 1 STEM Job Search Platform LetUin & Career Community Comento

    • Circuit Design Job Mentor

  • At more than 10 universities, including Yonsei University, Hanyang University, and Konkuk University

    • Conducting circuit design job bootcamps / job special lectures

  • Regarding circuit design roles

    • Over 200 sessions of resume / self-introduction letter / interview consulting

  • K-Digital Basic Competency Training Instructor

    • "Stop with the difficult circuit formulas, Semiconductor Circuit (CHIP) Design through visualization"

  • YouTube channel operation

    • "Sam Coach, the Pathfinder for Circuit Design Jobs"

삼코치_프사_실물_배경X.png.webp

More

Curriculum

All

108 lectures ∙ (23hr 6min)

Course Materials:

Lecture resources
Published: 
Last updated: 

Reviews

All

5 reviews

5.0

5 reviews

  • aceoftop1975님의 프로필 이미지
    aceoftop1975

    Reviews 134

    ∙

    Average Rating 5.0

    5

    100% enrolled

    ===== 26/02/19/Thu 14:00 ===== Wow~~~! You are amazing. I can feel that the level of all the lectures—Analog / Digital / Circuit Design / PCB—is incredible. I’ve realized that Coach Sam can do everything on his own. Thank you for creating such great lectures.

    • samcoach
      Instructor

      Hello, sunny75. Thank you so much for always leaving such thoughtful course reviews. Every word of your high praise regarding the overall quality of the lectures—covering analog, digital, circuit design, and PCB—gives me great strength. In particular, it was deeply meaningful that you recognized the sincerity and essence of the lectures, as it shows you understood the exact direction I have prioritized while preparing them. Furthermore, while saying you realized you "can do everything on your own" is high praise indeed, I will take it as a sign that the material was conveyed clearly to the students and will cherish that feedback. I believe that a lecture must ultimately convince the learner "why it must be designed this way" and "how it is applied in the field," and I am beyond happy that you felt those aspects. Thank you once again for taking the time out of your busy schedule to leave such a precious review after completing 100% of the course. To repay your support, I will continue to provide even better lectures without compromising on density or quality. Thank you!
  • hyunseok12257126님의 프로필 이미지
    hyunseok12257126

    Reviews 1

    ∙

    Average Rating 5.0

    5

    11% enrolled

    It's the best.

    • 1987님의 프로필 이미지
      1987

      Reviews 5

      ∙

      Average Rating 5.0

      5

      35% enrolled

      This is a great help.

      • daeseonire6128님의 프로필 이미지
        daeseonire6128

        Reviews 3

        ∙

        Average Rating 5.0

        5

        100% enrolled

        • tmetospc5118님의 프로필 이미지
          tmetospc5118

          Reviews 13

          ∙

          Average Rating 5.0

          5

          31% enrolled

          samcoach's other courses

          Check out other courses by the instructor!

          Similar courses

          Explore other courses in the same field!

          Limited time deal ends in 1 days

          $269,500.00

          30%

          $297.00