강의

멘토링

로드맵

Hardware

/

Embedded IoT

Verilog FPGA Program 1 (Zynq mini 7020)

In this course, students will learn how to implement Verilog using the Zynq board.
(5.0) 3 reviews

80 learners

  • alex
텍스트 강의
베릴로그
verilog
하드웨어
zynq
Verilog HDL
FPGA

Reviews from Early Learners

What you will learn!

  • Verilog coding

  • Utilizing ZYNQ Board

  • How to use Vivado, Vitis

  • Create a Test Bench and Verify Simulation

  • Download to board and check results

The core of implementing and practicing using the Zynq board.

📢 Please note before taking the class.

  • This course is a text lecture in electronic document (PDF) format (approximately 110,000 characters). All source files covered in the course are provided to those who take the course. The course source code can be downloaded from Section 0 [Material Sharing Link].

Verilog implementation using the Zynq board

✅ Code implementation ✅ Simulation verification using Text Bench ✅ Board verification

Before coding, we analyze the overall system and provide know-how on how to code efficiently. We provide easy-to-understand explanations based on extensive techniques and know-how gained from over 20 years of field experience. Furthermore, the source code included in the lectures is not for study purposes but rather is used in real-world applications. All attendees will receive access to the full source code used in the lectures.

The first half of the lecture will cover the following two topics:

  • Install Vivado 2022.1
  • Download the code implemented on the Zynq board and check the results.

In the latter part of the lecture , we will verify the results downloaded to the board through coding and simulation verification for each topic.
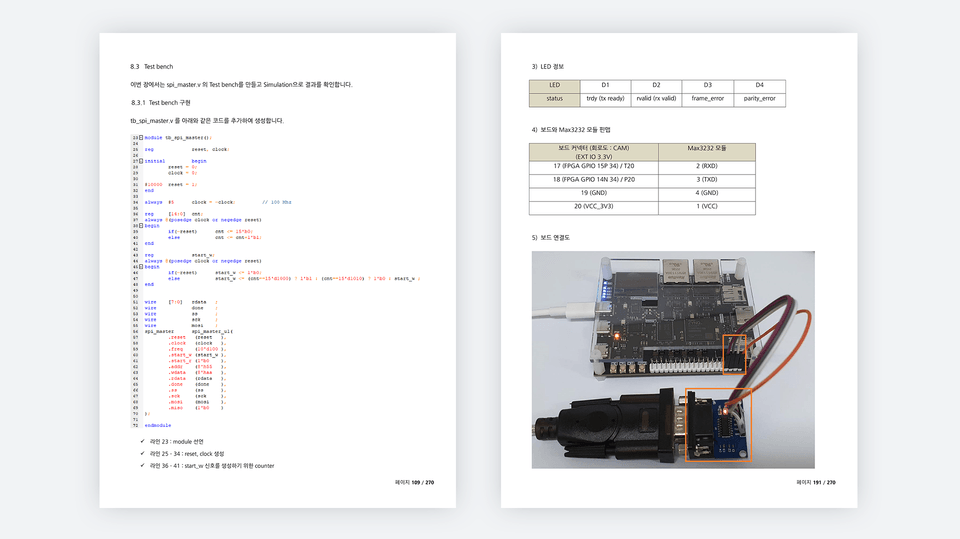
  • LED control using counter
  • SPI Controller Implementation
  • UART Controller Implementation
  • I2C Controller Implementation
  • Uses Xilinx IP (Clock Generator, Memory Generator)
  • NRZL Decoder implementation
  • Implementation of FMC (Flexible Memory Controller) Interface

FPGA Utilization with Verilog for ZYNQ - Lecture Preview

Detailed Curriculum
  1. outline
  2. HW configuration
  3. SW installation
  4. Download the ZynQ board
    1. Basic Template Configuration
      1. Create a project
      2. Create Block Design
    2. Download in Debug Mode
      1. Add source code
      2. Bitstream generation
      3. Run and download Vitis
    3. Download using FSBL (First Stage Bootloader)
      1. Create an FSBL project
      2. Create Boot Image
      3. Download the board and check the results
    4. Download using FSBL, Application SW
      1. Create an FSBL project
      2. Create an Application Project
      3. Create Boot Image
    5. Download the board and check the results
      1. LED control using counter
      2. Create a project
      3. Project screen configuration
      4. Add source code
      5. Text Editor Settings
      6. Code implementation
      7. XDC implementation
      8. Generate Bitstream
      9. Check results
    6. Simulation
      1. Add simulation source file
      2. Implementing the tb_led_counter.v code
      3. Simulation in progress
      4. Simulation results
    7. About the code
      1. Implementable code, non-implementable code
      2. The basic unit of code is Clock.
      3. All code is processed in parallel.
      4. ternary operator
      5. Use Register
      6. FSM (Finite State Machine)
    8. Spi Master implementation
      1. Specs
      2. Code implementation
        1. Port definition
        2. State definition
        3. Code implementation
        4. Timing diagram
      3. Simulation
        1. Test bench implementation
        2. Check simulation results
    9. Spi Slave Implementation
      1. Specs
      2. Code implementation
        1. Port definition
        2. State definition
        3. Code implementation
      3. Simulation
        1. Test bench implementation
        2. Check simulation results
    10. Spi communication implementation
      1. Button noise removal
        1. Button circuit
        2. Code implementation
        3. Simulation
      2. SPI Task Implementation
        1. Port definition
        2. Button noise removal
        3. State definition
        4. Code implementation
      3. Simulation
        1. Test bench implementation
        2. Check simulation results
      4. Implementing the UsetTop module
      5. Add xdc file
      6. Generate Bitstream
      7. Download the board and check the results
    11. Use of Xilinx IP
      1. Create a Clock
      2. Memory creation
        1. Block Memory Generator
      3. Memory Test
        1. Single Port RAM
        2. Simple Dual Port RAM
        3. Other memory
    12. UART Controller Implementation
      1. Uart Tx implementation
        1. Code implementation
        2. simulation
      2. Uart Rx implementation
        1. Create FIFO
        2. Code implementation
        3. simulation
      3. Uart Controller Implementation
      4. LoopBack implementation
        1. composition
        2. Code implementation
        3. simulation
        4. Implementing the UserTop module
        5. xdc creation
        6. Generate Bitstream and XSA files
        7. Check results
    13. I2C Controller Implementation
      1. I2C Controller Specifications
        1. Start, Stop Condition
        2. 8-bit data transmission
        3. Slave ID
        4. I2C Write Data Structure
        5. I2C Read Data Structure
      2. I2C Master Implementation
        1. i2c_master write signal analysis
        2. i2c_master read signal analysis
        3. i2c_master code implementation
        4. i2c_master simulation
        5. Check results
        6. i2c_master8x8 implementation
        7. i2c_master8x8 simulation
      3. I2C Slave Implementation
        1. I2C Slave Signal Analysis
        2. i2c_slave8x8 code implementation
        3. i2c_reg8x8 implementation
        4. i2c_slave8x8, i2c_reg8x8 simulation
      4. I2C TASK
        1. i2c_task code implementation
      5. Implementing the UserTop module
      6. Add xdc file
      7. Generate Bitstream and XSA files
      8. Download the board and check the results
    14. NRZL Decoder implementation
      1. System Overview
      2. Code implementation
        1. Create a clock
        2. Create FIFO
        3. data_counter implementation
        4. noise_reduction implementation
        5. data_encoder implementation
        6. nrzlDecTop implementation
        7. Implementing the UserTop module
        8. xdc implementation
        9. Create Bitstream and XSA files and check the results
        10. conclusion
    15. FMC Interface Implementation
      1. FMC Timing
      2. Code implementation
        1. fmc_model.v
        2. simulation fmc_model
        3. fmc_interface.v
        4. sys_host.v
        5. spram_32x8192
        6. simulation fmc_interface
        7. fmc_top.v
        8. UserTop.v
        9. UserTop.xdc
      3. Bitstream generation
      4. Resolving Timing Errors
      5. Download the board and check the results
      6. conclusion
    16. Revision History

Q&A 💬

Q. Who is the target audience for this lecture?

This course is designed for those interested in learning Verilog and FPGAs. This course restructures the "Using FPGAs with Verilog" section to enable implementation on the Zynq board. All source code is verified on the Zynq mini 7020 (7010) board.

Q. Is there anything I need to prepare to attend the lecture?

All of the lecture content can be practiced on the Zynq mini 7020 (7010) board. Having a Zynq mini 7020 (7010) board available will be very helpful, as you can implement the code yourself and verify the results.

Q. What program tools do you use?

I'm using Vivado version 2022.1. The lecture includes instructions on installing tools, so please follow the instructions to install them.

Q. Where can I buy the Zynq mini board?

You can purchase it through domestic shopping malls or AliExpress.


Accumulated with 25 years of experience
We share our know-how on utilizing Verilog.

I've worked as a developer for over 20 years at both large and small companies, and I currently run a small business. I've developed an ISP (Image Signal Processing) ASIC for CCTV, and I've developed numerous FPGA-based products, including OLED inspection equipment and DAQ (Data Acquisition System). Beyond FPGAs, I have extensive experience in software development (STM32, PIC32, AVR, ATMEGA, etc.), circuit design, and Windows programming.

💾 Please check the lecture environment.

  • The practice environment uses Windows OS and Vivado 2022.1.
  • This lecture is a text lecture in electronic document (PDF) format (approximately 110,000 characters).

Recommended for
these people

Who is this course right for?

  • For those who want to learn FPGA

  • For those who want to learn Verilog

  • For those who want to learn Zynq

Need to know before starting?

  • C language

  • Verilog Language (Basics)

Hello
This is

1,677

Learners

71

Reviews

125

Answers

4.8

Rating

19

Courses

저는 지난 20여년 동안 대기업, 중소기업에서 개발자로 일해왔고

현재는 작은 기업의 대표로 있습니다.

주요 경력사항은

  • Verilog HDL을 이용한 FPGA 설계

    • CCTV용 ISP ASIC 개발 (약 10년)

    • OLED Display 검사장비 개발 (약 3년)

    • FPGA를 이용한 장비 개발

  • MCU FW

    • STM32

    • PIC32

    • AVR, ATMEGA

    • DSP (TI)

  • Windows Application Program

    • Visual Studio MFC, C++

입니다.

Curriculum

All

381 lectures

Course Materials:

Lecture resources
Published: 
Last updated: 

Reviews

All

3 reviews

5.0

3 reviews

  • hyp6636님의 프로필 이미지
    hyp6636

    Reviews 5

    Average Rating 5.0

    5

    75% enrolled

    Tìm một khóa học thiết kế FPGA khó hơn bạn nghĩ, nhưng đây là khóa học mà bạn có thể thấy thú vị khi làm theo từng bước trong sách giáo khoa!!! Ngoài bài giảng này, vui lòng làm nhiều bài giảng khác bằng bảng Zynq nhé~!! Tôi muốn nâng cao kỹ năng của mình bằng cách tham gia tất cả các lớp học, trải nghiệm và thực hành chúng haha.

    • ihil
      Instructor

      Cảm ơn bạn đã xem xét của bạn. Tôi đã nỗ lực rất nhiều để thực hiện nó, nhưng những đánh giá về khóa học này đã giúp tôi rất nhiều. verilog và fpga không dễ học. Tuy nhiên, nếu bạn học từng bước một, kỹ năng của bạn sẽ dần được cải thiện và sự tự tin của bạn sẽ tăng lên. Tôi hy vọng bạn trở thành một nhà phát triển có năng lực thông qua bài giảng. Cảm ơn bạn ~!!

  • hotak3210195님의 프로필 이미지
    hotak3210195

    Reviews 5

    Average Rating 5.0

    5

    100% enrolled

    Nó đã giúp tôi với phong cách viết mã của mình.

    • ihil
      Instructor

      Cảm ơn bạn đã giúp tôi với phong cách mã hóa của tôi. Tôi nghĩ điều rất quan trọng đối với các nhà phát triển là phát triển phong cách viết mã của riêng họ. Thời gian trôi qua, tôi tin rằng việc sử dụng SM (State Machine) trong phát triển thuật toán là rất quan trọng và hữu ích. Chúng tôi khuyên bạn nên sử dụng SM nhiều. Cảm ơn bạn~!!

  • ghddrms14061304님의 프로필 이미지
    ghddrms14061304

    Reviews 1

    Average Rating 5.0

    5

    10% enrolled

    Chào bạn, tôi là học viên đã mua khóa học gần đây. Tôi có một thắc mắc là không biết nên sử dụng tài liệu giảng dạy này như thế nào. Liệu việc chỉ gõ trực tiếp mã nguồn và thắc mắc tại sao lại viết mã như vậy có giúp cải thiện kỹ năng lập trình không? Nếu bạn có thể cho tôi biết phương pháp học cụ thể thì tôi rất cảm kích.

    • ihil
      Instructor

      Chào bạn! Việc học Verilog, FPGA rất khác so với các ngôn ngữ cấp cao (C, App, Java,...). Verilog, FPGA có liên quan mật thiết đến phần cứng (HW). Tức là tự thiết kế HW. Ví dụ, khi xem xét giao tiếp UART, ở tầng Application cấp cao, chúng ta tạo giao thức nối tiếp và thực hiện giao tiếp. Ở tầng FPGA, chúng ta thiết kế và triển khai chính bộ điều khiển UART. Những gì được triển khai ở tầng FPGA được thực hiện ở đơn vị Main Clock. Chúng ta triển khai cách các tín hiệu được triển khai ở mỗi Clock. Trong Application, chúng ta triển khai code ở cấp độ Protocol. Để học Verilog, FPGA, việc triển khai code trên bo mạch mục tiêu, xác nhận HW hoạt động theo code đã triển khai và tất nhiên, để triển khai/xác minh code, chúng ta phải xác nhận xem các tín hiệu có hoạt động chính xác ở mỗi clock thông qua mô phỏng hay không. Để học Verilog, FPGA, việc học chỉ để nghiên cứu có thể không có nhiều ý nghĩa. Cách tốt nhất là làm quen với các chức năng cơ bản (bạn phải học cách tự do triển khai code và sử dụng các công cụ) và triển khai một cái gì đó mới trong khi thực hiện các dự án thực tế. Bạn có thể coi bài giảng này là học các công nghệ tiên quyết để thực hiện một dự án thực tế. Để thực hiện một dự án thực tế, điều rất quan trọng là phải tự do xử lý Verilog, FPGA, các công cụ, v.v. Bạn cần làm quen với quy trình mã hóa bằng Verilog, xác minh bằng mô phỏng (nếu có lỗi, hãy sửa code và xác minh lại bằng mô phỏng), tải nội dung đã triển khai lên bo mạch và kiểm tra hoạt động. Nếu bạn làm quen với nội dung của bài giảng này ở một mức độ nào đó, bạn có thể tiến hành các dự án từ nhỏ trong thực tế. Dự án tôi đã thực hiện gần đây là triển khai Frame Converter (DDR3) trong FPGA để xuất dữ liệu hình ảnh nhận được từ PC qua USB sang LVDS. Để triển khai những điều này, bạn cần có nội dung của bài giảng này, triển khai DDR3 Controller và hiểu LVDS. Dù sao, quá trình học Verilog, FPGA không hề dễ dàng. Tuy nhiên, tôi nghĩ rằng bạn sẽ trở thành một nhà phát triển giỏi nếu bạn làm quen với các chức năng cơ bản, thực hiện các dự án trong thực tế và học hỏi các kỹ thuật khác nhau. Hãy kiên nhẫn học tập. Cảm ơn bạn.

    • Trước hết, xin chân thành cảm ơn vì câu trả lời chi tiết của bạn. Trong tương lai, nếu có bất kỳ thắc mắc hoặc khó khăn nào phát sinh trong quá trình học, tôi có thể đặt câu hỏi ở đây được không? Nếu bạn có phương pháp nào tiện lợi hơn để trao đổi qua email hoặc liên lạc, xin vui lòng cho tôi biết.

    • ihil
      Instructor

      Bạn có thể gửi qua email hoặc đăng câu hỏi trên quán cafe mà tôi điều hành. Email: alex@ihil.co.kr Cafe: Cafe.naver.com/worshippt Cảm ơn bạn!

    • 네넵, tôi hiểu rồi. Chúc bạn một ngày tốt lành. Cảm ơn bạn.

$84.70

alex's other courses

Check out other courses by the instructor!