[인프런 워밍업 3기] 2주차 발자국
[2주차]
강의수강
이론으로 알고 있었지만 실습에 들어가니 스프링은 굉장히 개념들이 잘 세분화 되어있다는 것을 느낄 수 있었습니다.
실습해보면서 배운 각 개념들에 대해 회고하며 복습해보도록 하겠습니다.

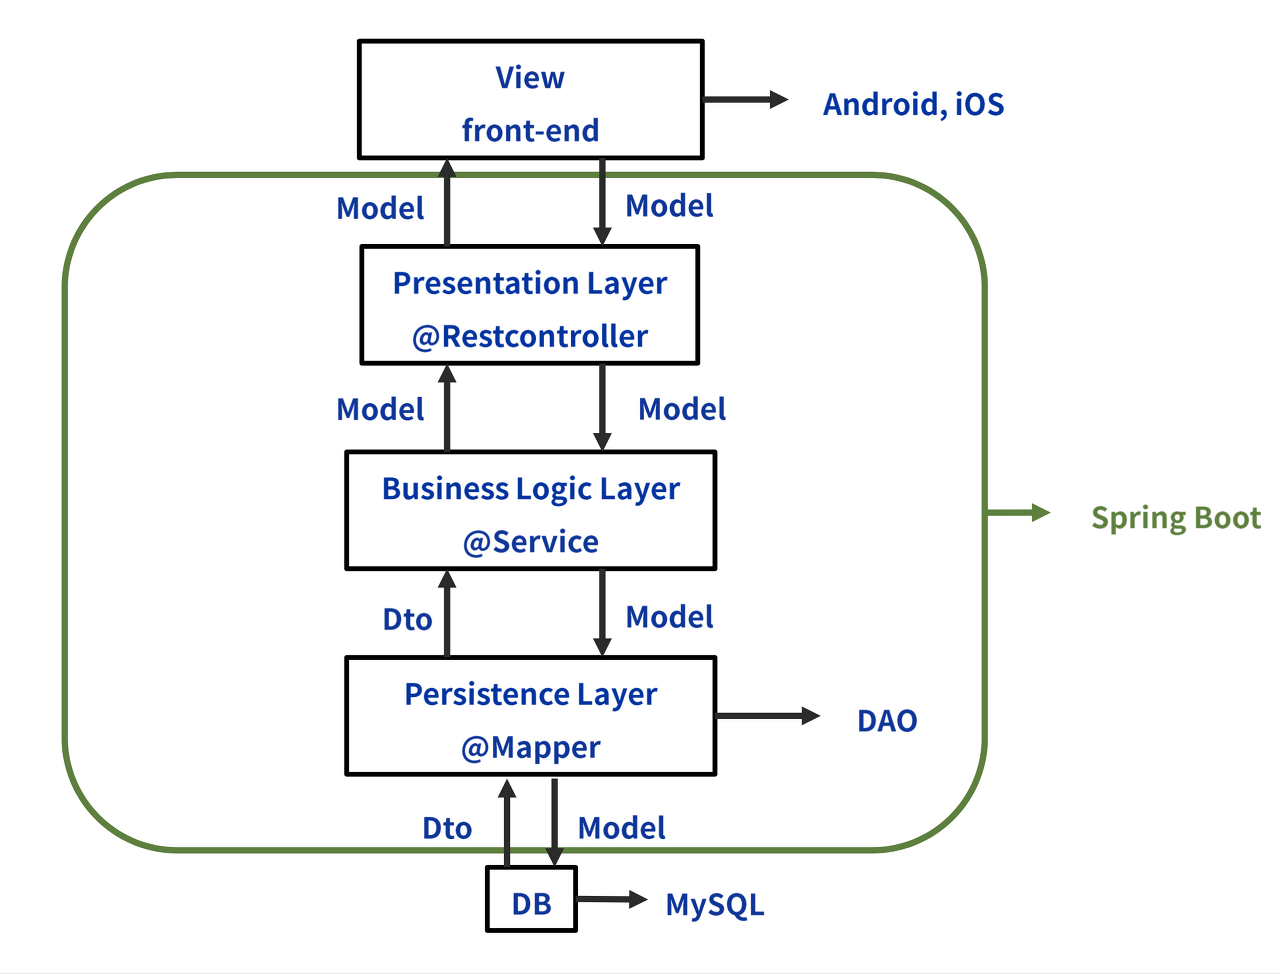
Repository: 데이터베이스와 직접적으로 상호작용하는 계층.
DB 쿼리에 대한 청사진을 그린다고 이해했습니다. -> 그 역할을 해주는 인터페이스가 JPA.
그 인터페이스를 받아서 @Repository가 붙인 Presentation 컴포넌트 클래스에서 직접 사용.
interface AchievementRepository : JpaRepository<Achievement, Long> {

  // 문법에 맞게 JPA를 작성하면 DB에서 다음과 같은 쿼리가 작용한다.
  // select * from achievement where is_active = :isActive
  fun findAllByIsActive(isActive: Boolean): List<Achievement>

}
// 개별적인 JPA Repository의 기능을 모아서 제공하는 서비스 성격의 Repository 클래스. @Repository class PresentationRepository( // 여러 개의 Repository 인터페이스를 필드로 주입받는다. private val achievementRepository: AchievementRepository, private val experienceRepository: ExperienceRepository, private val introductionRepository: IntroductionRepository, private val linkRepository: LinkRepository, private val projectRepository: ProjectRepository private val skillRepository: SkillRepository, ) { fun getActiveAchievements(): List<Achievement> { return achievementRepository.findAllByIsActive(true) } ... }DTO(Data Transfer Object, 데이터 전송 객체). 쉽게 말해, 여러 개의 데이터를 하나의 상자로 포장해 옮긴다.
레이어드 계층 간에 데이터 전송을 위한 객체.
순수 데이터 이동이 목적. 거기에 불필요한 데이터 전송을 방지해 보안성을 높인다고 함.
사용 사례
// Introduction Entity에는 content와 isActive 필드가 있다.
// 그중에서 content 필드만 선택적으로 골라서 전송하는 것이다.
data class IntroductionDTO(
  val content: String
) {
  constructor(introduction: Introduction) : this(
    content = introduction.content
  )
}
@Service class PresentationService( private val presentationRepository: PresentationRepository ) { // 트랜잭션을 간편하게 열고 닫을 수 있게 해줍니다. @Transactional(readOnly = true) fun getIntroductions(): List<IntroductionDTO> { val introductions = presentationRepository.getActiveIntroductions() // 엔터티 리스트 가져오기 return introductions.map { introduction -> IntroductionDTO(introduction) } // DTO 변환 후 반환 } }Service: 비즈니스 로직을 담당하는 계층
여러 개의 Repository에서 데이터를 가져와 비즈니스에 맞게 조합하는 계층.
단순 조합을 넘어 요구사항에 맞는 규칙을 적용하는 것도 가능.
Controller와 Repository 중간에서 데이터를 제어.
Controller: 사용자의 요청을 처리하는 계층.
사용자가 원하는 데이터를 조회하거나, 자신이 알고있는 데이터를 서버에 전송한다. Request.
Controller에서 검증
사용자의 요청에 응답한다. 알고 있는 데이터를 보여준다던지 받아서 저장한다든지. Response.
우리 실습에선 ApiController와 ViewController가 있었다. 각각 REST Api와 웹 페이지 담당이라고 하는데 ApiController가 잘 이해가 안돼서 다시 봐야될 것 같다...
@Controller
class PresentationViewController(
  private val presentationService: PresentationService
)  {
  @GetMapping("/")
  fun index(model: Model): String {
    // 변수 model에 Introduction 정보를 추가한다.
    val introductions = presentationService.getIntroductions()
    model.addAttribute("introductions", introductions)

    // 변수 model에 Link 정보를 추가한다.
    val links = presentationService.getLinks()
    model.addAttribute("links", links)

    return "presentation/index"
  }
}
테스트 코드: 코드의 안정성을 보장하는 장치. 개발 시 가장 많은 시간이 소비되는 작업.
"코드가 잘 작동하는걸 증명할게!"라는 느낌으로 작성.
각 계층마다 예상되는 오류를 최대한 많이 상정해서 테스트 코드를 많이 만드는게 좋음.
given, when, then으로 나눠서 테스트 코드를 작성한다고 함.
@SpringBootTest
@AutoConfigureMockMvc
@DisplayName("[API 컨트롤러 테스트]")
class PresentationApiControllerTest(
  @Autowired private val mockMvc: MockMvc
)  {
      @Test
      @DisplayName("Introductions 조회")
      fun testGetIntroductions() {
        // given
        val uri = "/api/v1/introductions"

        // when
        val mvcResult = performGet(uri)
        val contentAsString = mvcResult.response.getContentAsString(StandardCharsets.UTF_8)
        val jsonArray = JSONArray(contentAsString)

        // then
        assertThat(jsonArray.length()).isPositive()
     }
}
Thymeleaf 중복 처리에 대하여
Thymeleaf: Spring Boot에서 사용하는 서버사이드 템플릿 엔진. 즉, 백엔드에서 동적으로 HTML을 생성할 수 있도록 도와주는 도구
받아온 템플릿을 고치는 과정에서 중복 처리 과정을 거쳤다.
페이지마다 중복되는 navigation, header, footer를 각 html로 옮긴뒤 불러오기 기능을 사용하는 것.
새 페이지를 만들 때 사용하면 코드의 가독성도 오르고, 작업 효율도 오를 것이다.
힘들었던 점
실행을 해보니 resume와 projects 웹페이지의 응답이 이뤄지지 않아 적잖이 당황했었다.
로그 메세지를 따라가면서 모든 계층을 확인해봐도 해결이 안되던 것이었는데 결국 문제는 Repository 이름 오타 때문에 클래스를 찾지 못해 Controller 작동이 안되던 것이었다.
되게 단순한 문제였지만 동시에 찾기 어려웠다. 기본을 잘 지키며 개발해야겠다고 생각했다...
