PVC/PV, Deployment, Service 이해하기[미션4]
1. PV, PVC
1-1 API - 파일 생성
http://192.168.56.30:31231/create-file-pod
http://192.168.56.30:31231/create-file-pv

1-2 Container 임시 폴더 확인 / Container 영구저장 폴더 확인 / master node 폴더 확인
Container 임시 폴더 확인
[root@k8s-master ~]# kubectl exec -n anotherclass-123 -it <pod-name> -- ls /usr/src/myapp/tmp

Container 영구저장 폴더 확인
[root@k8s-master ~]# kubectl exec -n anotherclass-123 -it <pod-name> -- ls /usr/src/myapp/files/dev

master node 폴더 확인
[root@k8s-master ~]# ls /root/k8s-local-volume/1231

1-3 Pod 삭제
[root@k8s-master ~]# kubectl delete -n anotherclass-123 pod <pod-name>

1-4 API - 파일 조회
http://192.168.56.30:31231/list-file-pod
http://192.168.56.30:31231/list-file-pv
==> 조회가 되던 두 파일 모두 조회가 되지 않습니다.
1-5 hostPath 동작 확인 - Deployment 수정 후 [1-1~1-4] 실행
아래 명령어로 Deployment yaml 파일 수정
[root@k8s-master ~]# kubectl edit deployments.apps -n anotherclass-123 api-tester-1231
아래와 같이 Deployment 수정
apiVersion: apps/v1
kind: Deployment
metadata:
  namespace: anotherclass-123
  name: api-tester-1231
spec:
  template:
    spec:
      nodeSelector:
        kubernetes.io/hostname: k8s-master
      containers:
        - name: api-tester-1231
          volumeMounts:
            - name: files
              mountPath: /usr/src/myapp/files/dev
            - name: secret-datasource
              mountPath: /usr/src/myapp/datasource
      volumes:
        - name: files
          persistentVolumeClaim:  // 삭제
            claimName: api-tester-1231-files  // 삭제
          // 아래 hostPath 추가
          hostPath:
            path: /root/k8s-local-volume/1231
        - name: secret-datasource
          secret:
            secretName: api-tester-1231-postgresql
API - 파일 생성
http://192.168.56.30:31231/create-file-pod
http://192.168.56.30:31231/create-file-pv

Container 임시 폴더 확인
[root@k8s-master ~]# kubectl exec -n anotherclass-123 -it <pod-name> -- ls /usr/src/myapp/tmp

Container 영구저장 폴더 확인
[root@k8s-master ~]# kubectl exec -n anotherclass-123 -it <pod-name> -- ls /usr/src/myapp/files/dev

master node 폴더 확인
[root@k8s-master ~]# ls /root/k8s-local-volume/1231

Pod 삭제
[root@k8s-master ~]# kubectl delete -n anotherclass-123 pod <pod-name>

API 파일 조회
http://192.168.56.30:31231/list-file-pod
http://192.168.56.30:31231/list-file-pv
==> list-file-pv 만 조회됨
2. Deployment
2-1. RollingUpdate 하기
// 1) HPA minReplica 2로 바꾸기 (이전 강의에서 minReplicas를 1로 바꿔놨었음)
kubectl patch -n anotherclass-123 hpa api-tester-1231-default -p '{"spec":{"minReplicas":2}}'

// 1) 그외 Deployment scale 명령
kubectl scale -n anotherclass-123 deployment api-tester-1231 --replicas=2
// 1) edit로 모드로 직접 수정
kubectl edit -n anotherclass-123 deployment api-tester-1231

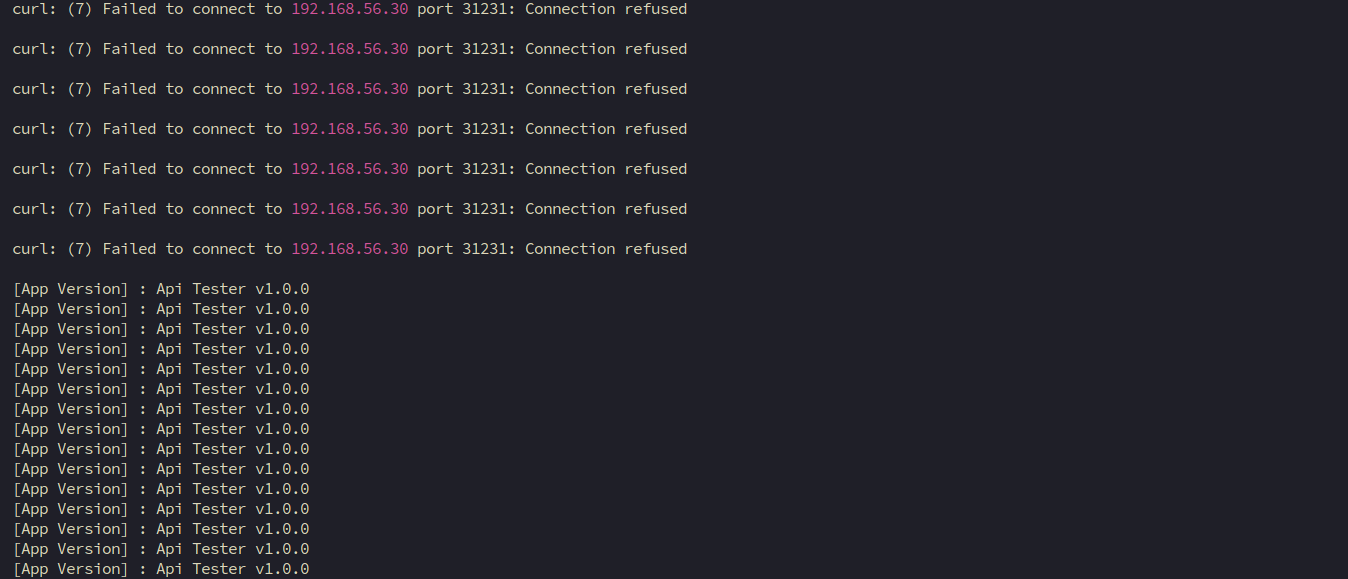
// 2) 지속적으로 Version호출 하기 (업데이트 동안 리턴값 관찰)
while true; do curl http://192.168.56.30:31231/version; sleep 2; echo ''; done;

// 3) 별도의 원격 콘솔창을 열어서 업데이트 실행
kubectl set image -n anotherclass-123 deployment/api-tester-1231 api-tester-1231=1pro/api-tester:v2.0.0
kubectl set image -n anotherclass-123 deployment/api-tester-1231

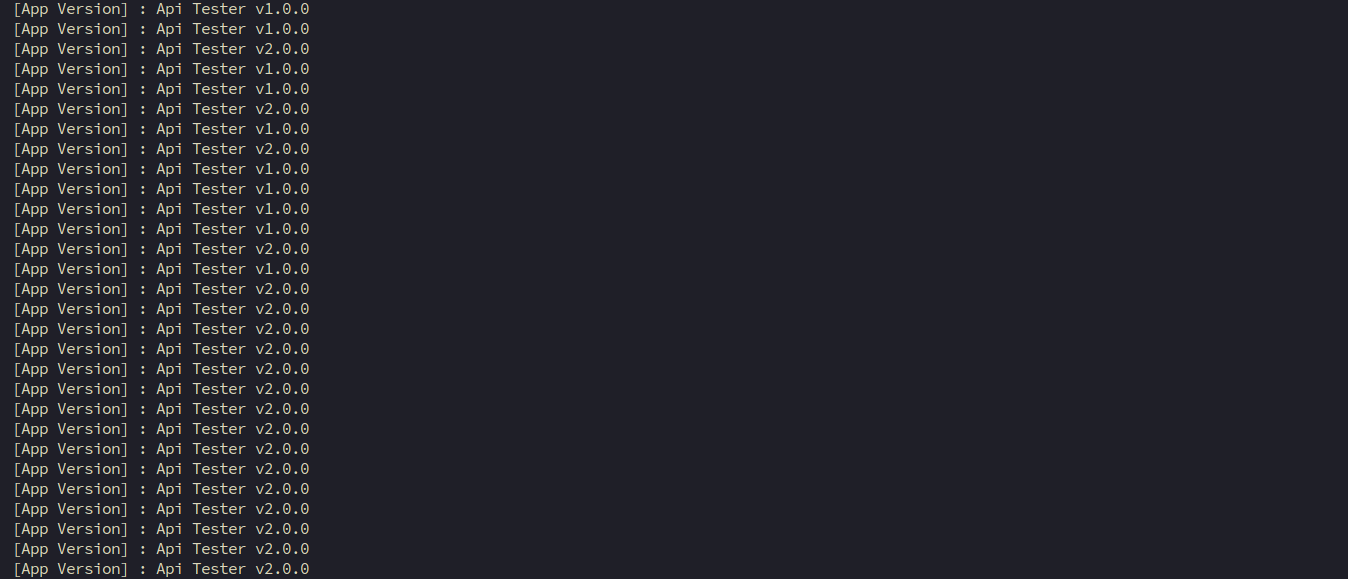
2-2. RollingUpdate (maxUnavailable: 0%, maxSurge: 100%) 하기
아래 명령어 Deployment yaml 파일 수정
[root@k8s-master ~]# kubectl edit deployments -n anotherclass-123 api-tester-1231
아래 내용과 같이 Deployment 수정
apiVersion: apps/v1
kind: Deployment
metadata:
  namespace: anotherclass-123
  name: api-tester-1231
spec:
  replicas: 2
  strategy:
    type: RollingUpdate
    rollingUpdate:
      maxUnavailable: 25% -> 0%  # 수정
      maxSurge: 25% -> 100%      # 수정
==> 이렇게 하게 되면 Blue/Green과 같은 효과 낼 수 있습니다.
==> 따라서 두 버전이 번갈아 나오지 않을 것으로 예상됩니다.
kubectl set image -n anotherclass-123 deployment/api-tester-1231 api-tester-1231=1pro/api-tester:v1.0.0
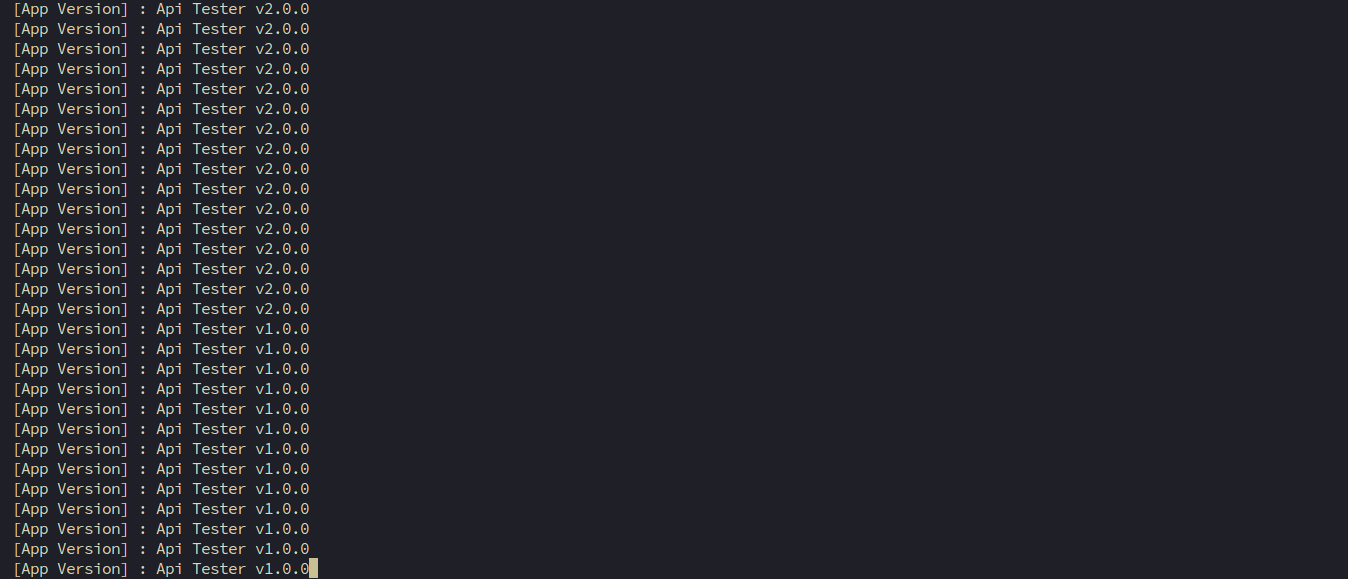
2-3. Recreate 하기
아래 명령어 Deployment yaml 파일 수정
[root@k8s-master ~]# kubectl edit deployments -n anotherclass-123 api-tester-1231
아래 내용과 같이 Deployment 수정
apiVersion: apps/v1
kind: Deployment
metadata:
  namespace: anotherclass-123
  name: api-tester-1231
spec:
  replicas: 2
  strategy:
    type: RollingUpdate -> Recreate   # 수정
    rollingUpdate:        # 삭제
      maxUnavailable: 0%  # 삭제
      maxSurge: 100%      # 삭제
==> 이렇게 하게 되면 업데이트 하면서 모든 Pod를 지웠다가 새 버전의 Pod를 생성한 뒤 서비스가 재시작 됩니다.
kubectl set image -n anotherclass-123 deployment/api-tester-1231 api-tester-1231=1pro/api-tester:v2.0.0
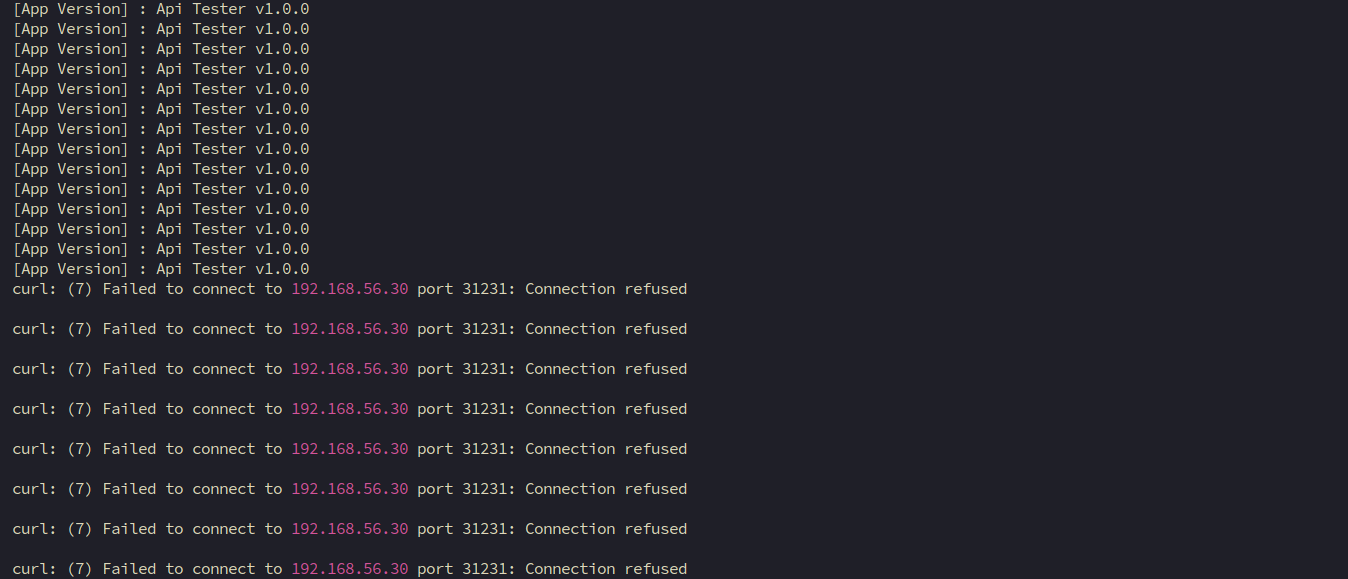
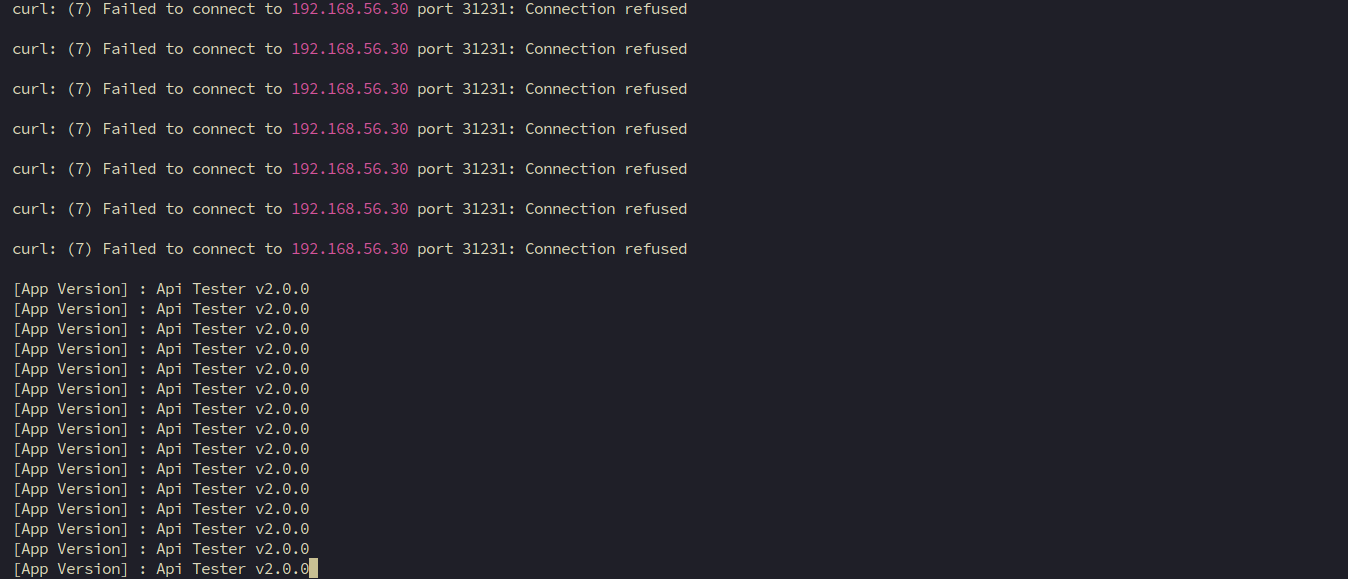
2-4. Rollback
kubectl rollout undo -n anotherclass-123 deployment/api-tester-1231
==> 이전 버전으로 롤백
3. Service
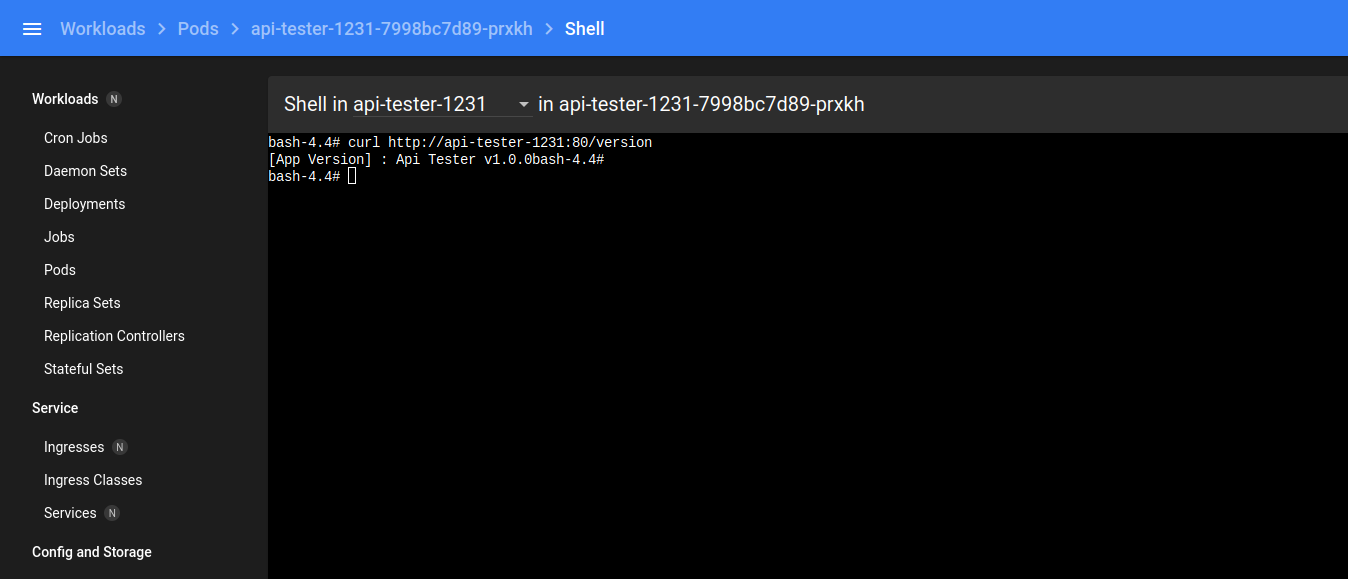
3-1. Pod 내부에서 Service 명으로 API 호출 [서비스 디스커버리]
Version API 호출
curl http://api-tester-1231:80/version
3-2. Deployment에서 Pod의 ports 전체 삭제, Service targetPort를 http -> 8080으로 수정
아래 두 명령어들로 Deployment와 Service yaml 파일 수정합니다.
[root@k8s-master ~]# kubectl edit deployments -n anotherclass-123 api-tester-1231
[root@k8s-master ~]# kubectl edit service -n anotherclass-123 api-tester-1231
아래 내용으로 각각 수정합니다.
apiVersion: apps/v1
kind: Deployment
metadata:
  namespace: anotherclass-123
  name: api-tester-1231
spec:
  template:
    spec:
      nodeSelector:
        kubernetes.io/hostname: k8s-master
      containers:
        - name: api-tester-1231
          ports:                // 삭제
          - name: http          // 삭제
            containerPort: 8080 // 삭제
---
apiVersion: v1
kind: Service
metadata:
  namespace: anotherclass-123
  name: api-tester-1231
spec:
  ports:
    - port: 80
      targetPort: http -> 8080 // 변경
      nodePort: 31231
  type: NodePort
3-3. 그리고 다시 Pod 내부에서 Service 명으로 API 호출
curl http://api-tester-1231:80/version
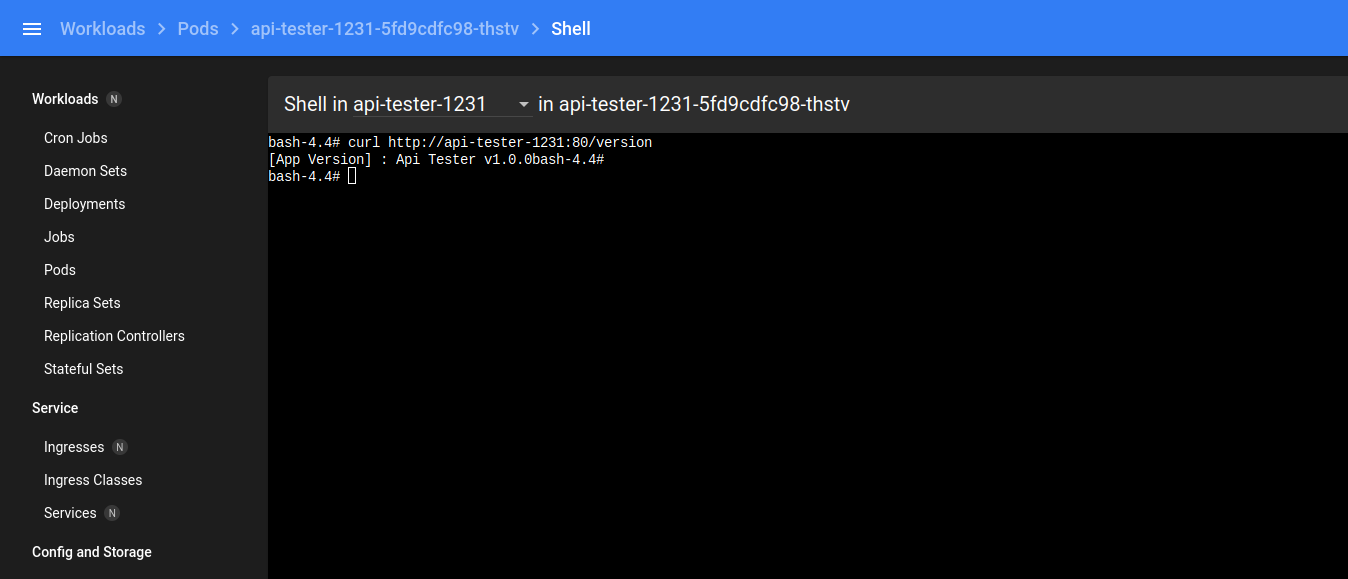
그래도 정상적으로 호출됩니다.
4. HPA
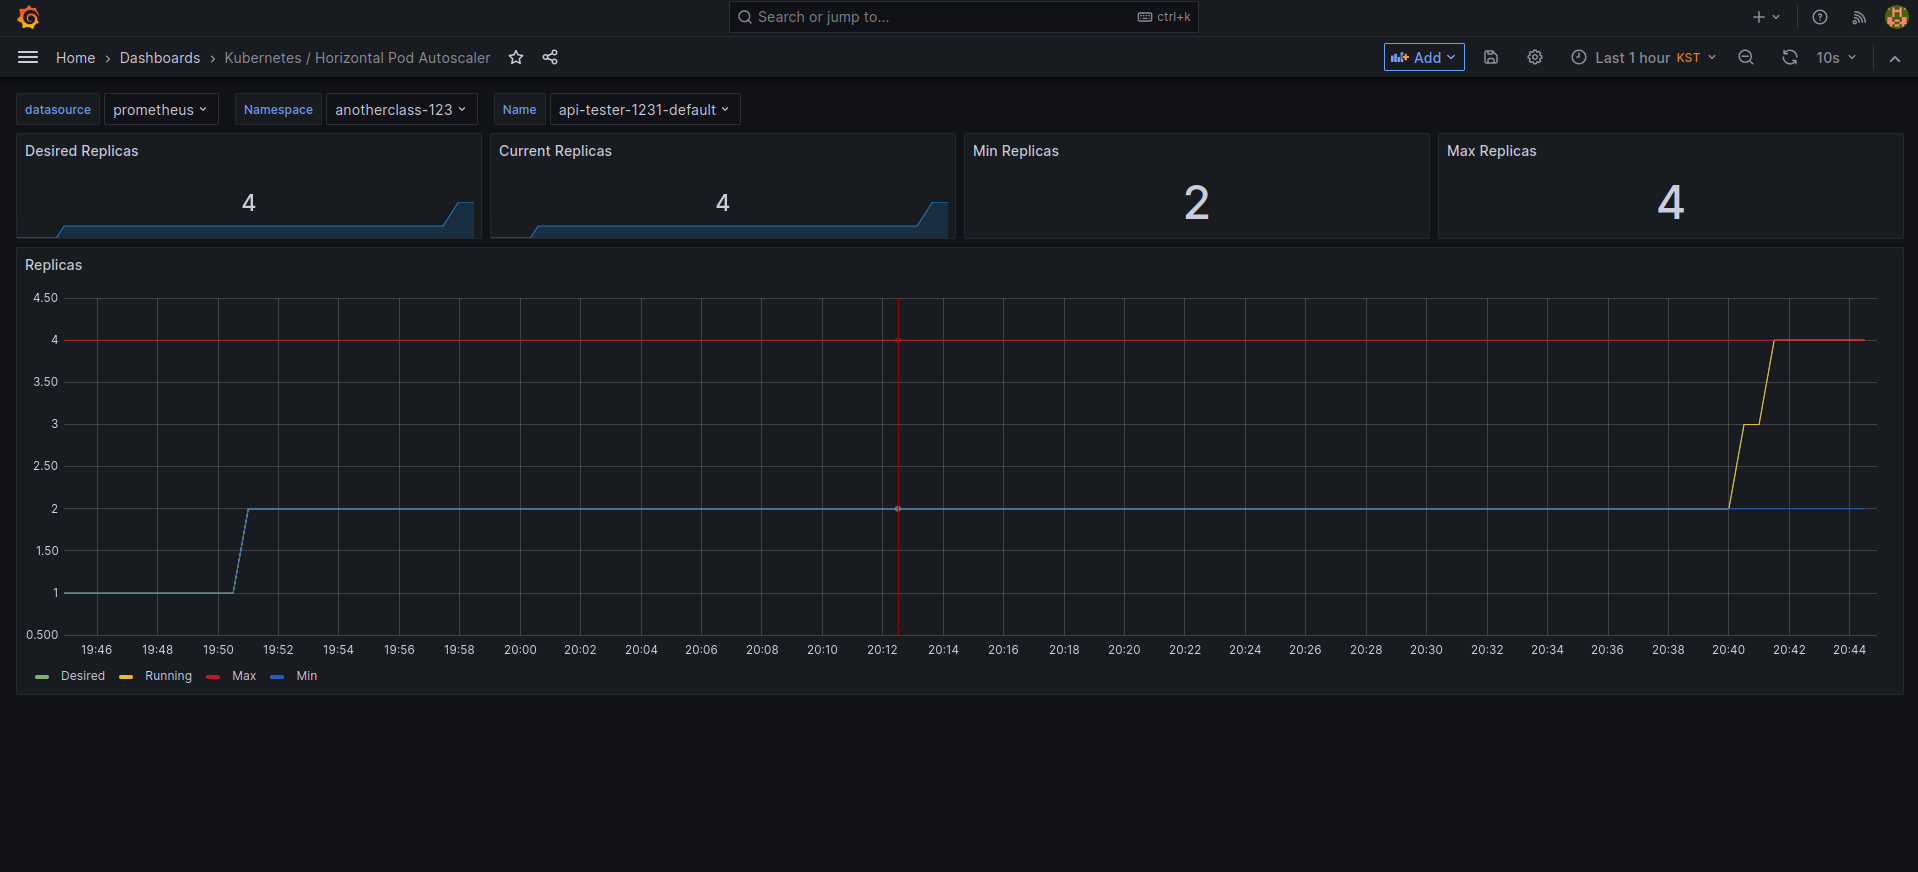
4-1. 부하 발생
3분 동안 부하 발생
http://192.168.56.30:31231/cpu-load?min=3
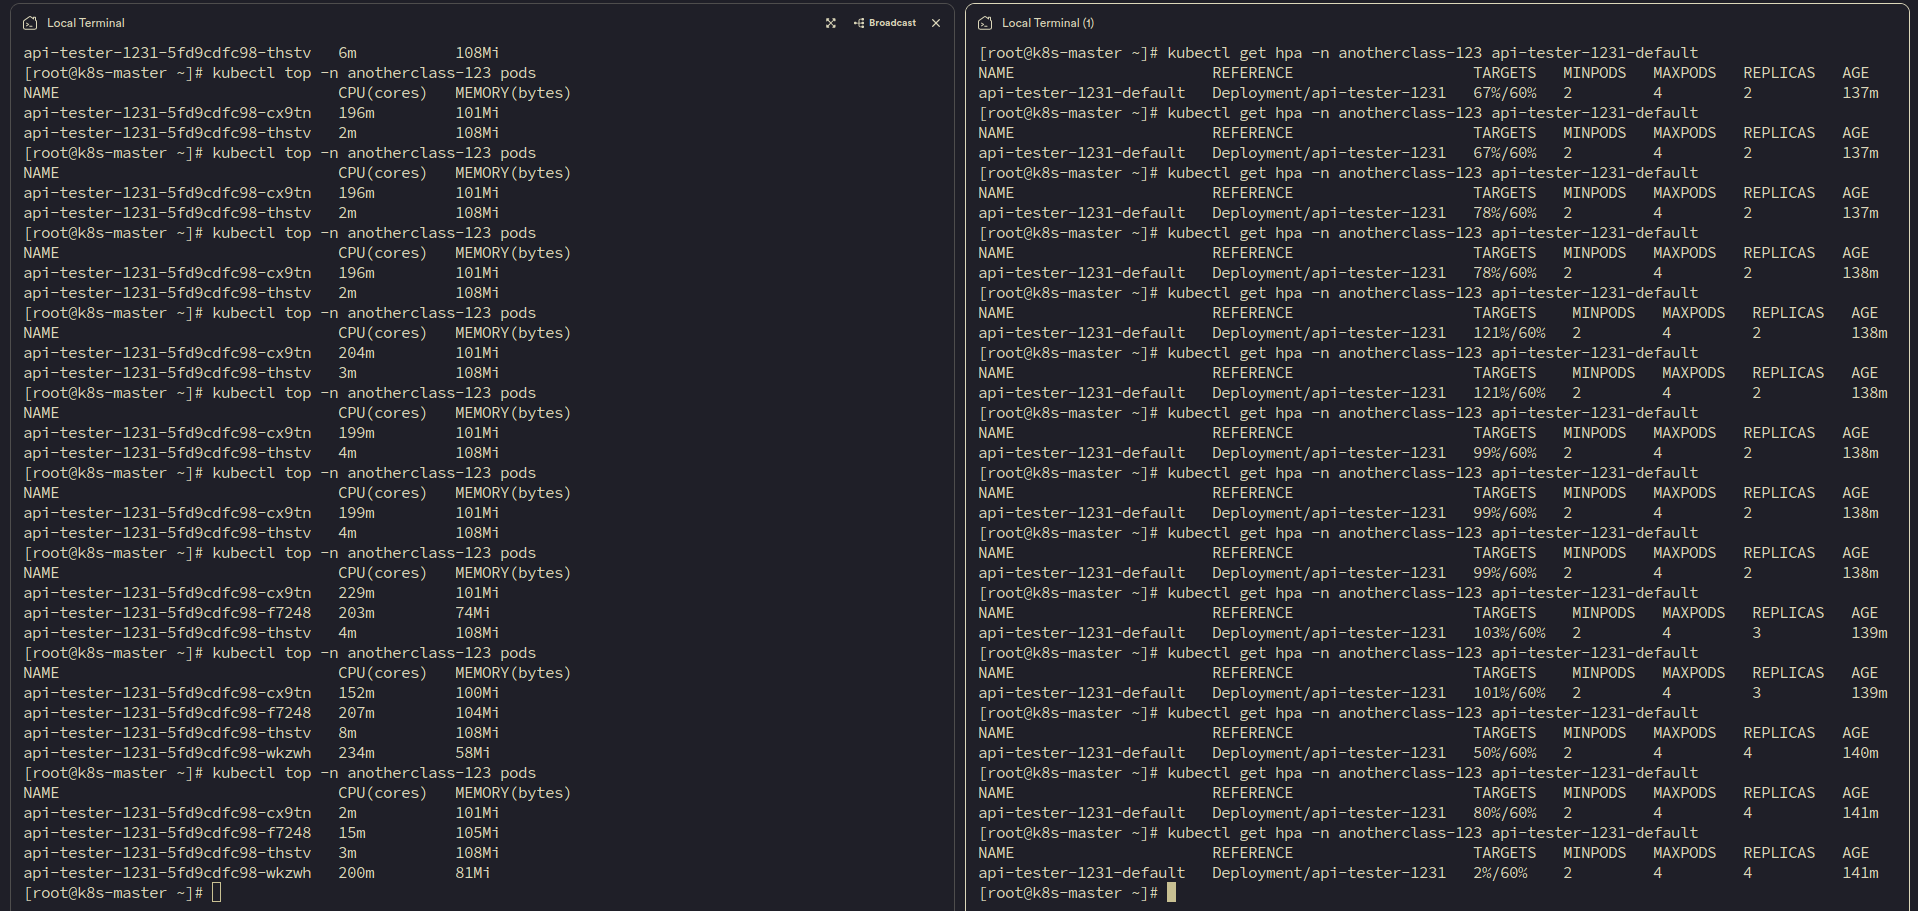
4-2. 부하 확인
아래 명령들로 확인
kubectl top -n anotherclass-123 pods
kubectl get hpa -n anotherclass-123
왼쪽이 top / 오른쪽이 get hpa
4-3. [behavior] 미사용으로 적용
아래 명령어로 HPA yaml 파일 수정
kubectl edit -n anotherclass-123 hpa api-tester-1231-default
아래와 같이 HPA 수정
---
apiVersion: autoscaling/v2
kind: HorizontalPodAutoscaler
metadata:
  namespace: anotherclass-123
  name: api-tester-1231-default
spec:
  behavior:  # 삭제
    scaleUp:   # 삭제
      stabilizationWindowSeconds: 120   # 삭제
4-4. 부하 발생
http://192.168.56.30:31231/cpu-load
// 2분 동안 10개의 쓰레드로 80% 부하 발생
// default : min=2, thread=10
4-5. 부하 확인
아래 명령들로 확인
kubectl top -n anotherclass-123 pods
kubectl get hpa -n anotherclass-123
왼쪽이 top / 오른쪽이 get hpa
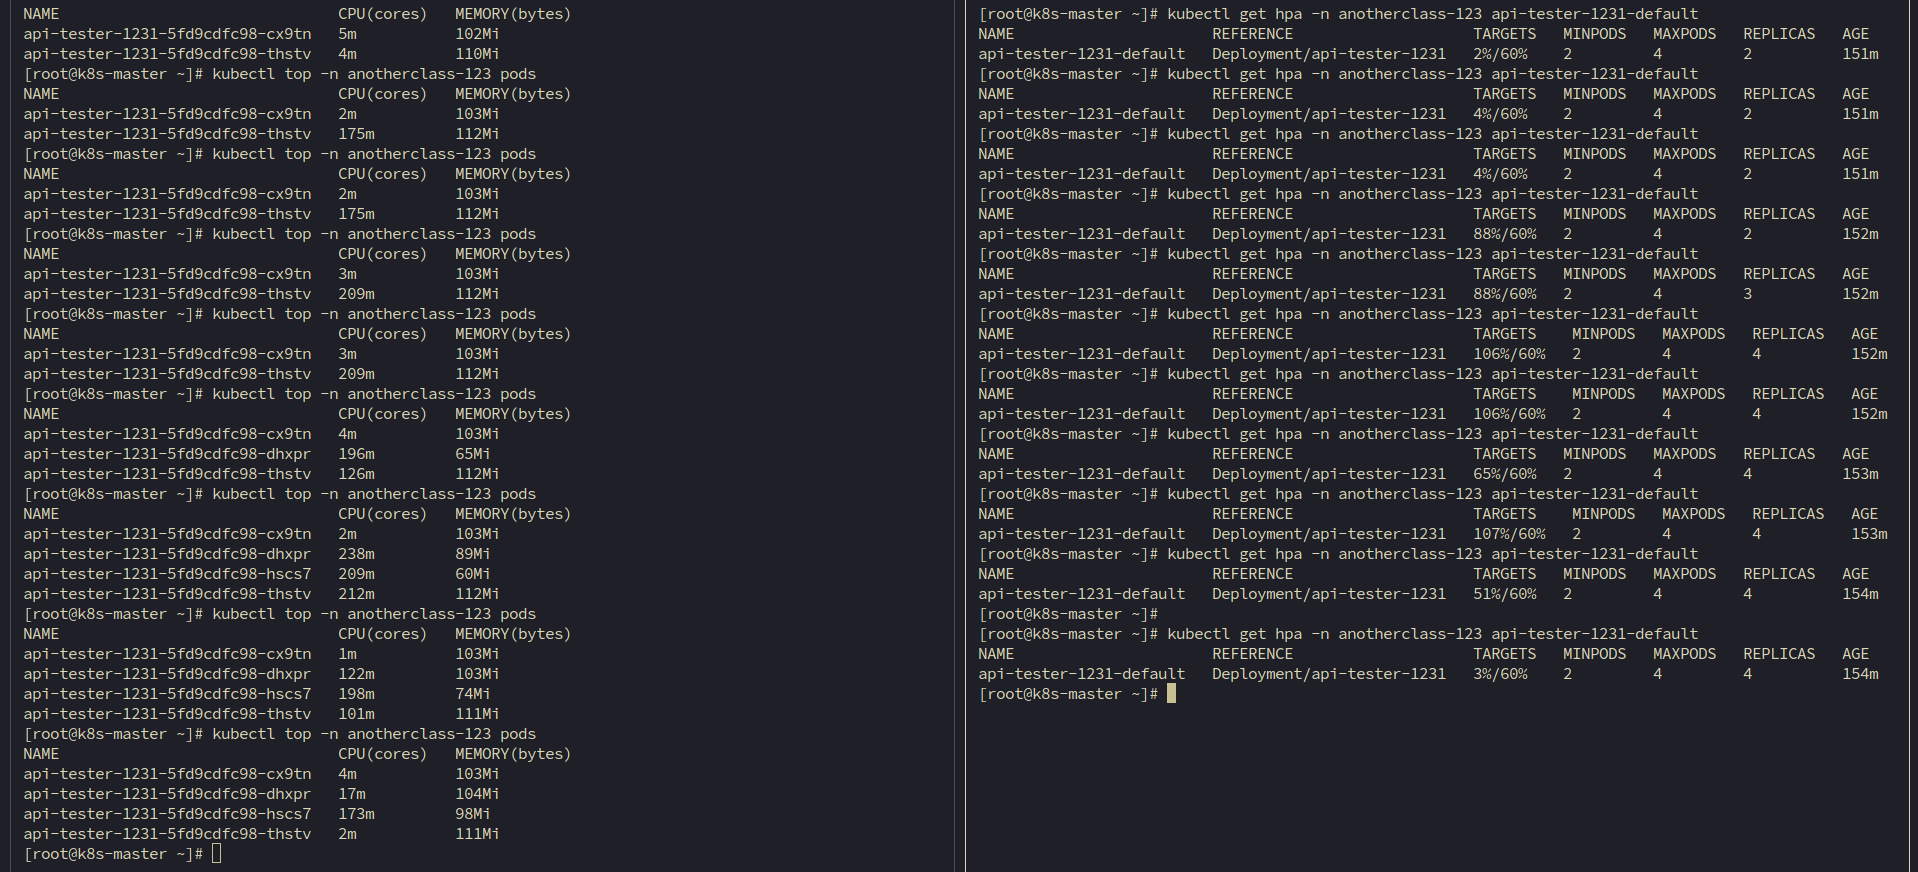
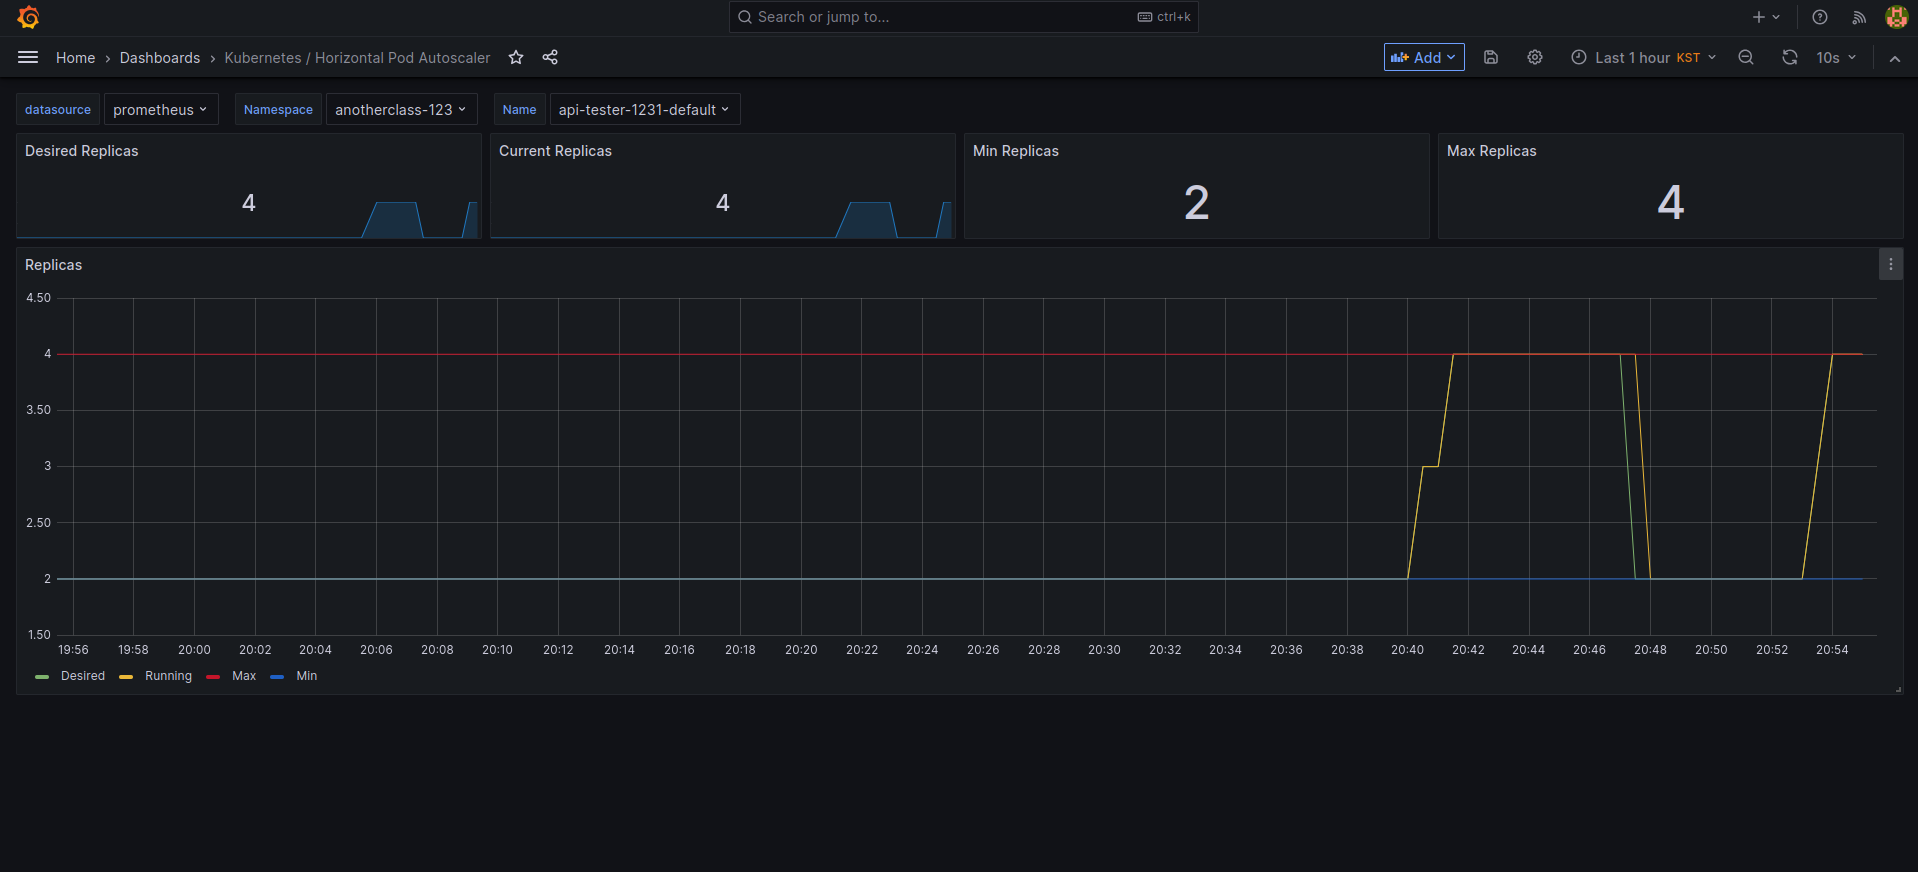
==> 보다 민감하게 Pod가 생성되는 것 확인 가능합니다.
댓글을 작성해보세요.
